Header bidding has become the norm in programmatic selling and buying. Implementing the technique on the website can help you bring in more ad revenue with greater transparency. But that’s not the whole picture.
At first, you might think that implementing a header bidding set-up would be enough to take your programmatic advertising to the next level. The truth is that header bidding is not a one-size-fits-all situation. It would help if you did much more to improve your ad revenue.
This article will explain how to set up header bidding effectively to optimize eCPMs and page loading speed. Before we dive into the optimization strategies, let’s look at the reasons for low eCPM in header bidding.
Table of Contents
Reasons behind low eCPM in header bidding
Now that you have got all the data, how well is your header bidding performing? If everything is well and the implementation is flawless, you are on the right track. If the set-up is not producing the desired results, the question in your mind should be why.
First, let’s understand the reasons behind the poor performance of header bidding. Once you know the shortcomings of your header bidding solution, you can focus on improving it. Several factors can impact the header bidding set-up and which you’ll need to consider. Let’s discuss them one by one.
- Price floor set-up: Many publishers have price floors (the minimum amount they’re willing to accept for a single ad impression) on their display inventory. However, the biggest lie publishers tell themselves is that setting up higher-priced floors will result in higher revenue. While a publisher can take advantage of this in the short term, fewer buyers will want to buy inventory at higher price floors in the long term. As a result, the ad fill rate may reduce, and overall revenue may decrease.
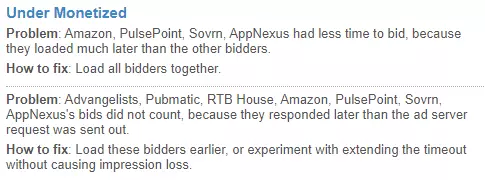
- Bidding partners’ sequence: What’s more important than winning the auction? Creating a fair environment for all the demand partners. If bid requests are sent each time in a sequence, but the order of the bidders does not change, the last bidder will have the least amount of time to respond. This means that when all other bids are received, the last bidder’s response may be too late to matter.
- Demand partner’s performance: A key benefit of header bidding is the idea that it drives up competition and prices for every impression in the auction. It is excellent because it allows more demand partners to vie for your inventory in real-time. But if they don’t have a high bid rate and win rate, then it might not make sense to have such partners. Adding every demand partner to your header bidding wrapper causes at least some increase in the website’s loading speed.
Are these the only factors behind low eCPMs? The answer is no! There are a lot of factors that affect the header bidding. Some of them are improper implementation of ad refresh, poor ad targeting, low users’ consent rate, and so on. We’ve discussed all the factors in this article.
Said that, just like any other technology, header bidding isn’t always rainbows and gumdrops. You have to monitor the setup and optimize it continuously for better results.
5 Wise Ways for Header Bidding Set-up Optimization
When it comes to increasing your eCPMs through header bidding, here are a few tips that work magic for the publishers:
Have an ideal number of demand partners
All in all, we suggest you add more than four demand partners but keep the number below 7 when you’re running client-side header bidding. For server-side header bidding, the count can be higher as the server takes on the burden.
The count differs for each setup and depends on various factors such as device type (mobile and desktop), audience location, website complexity, and auction infrastructure. Xandr suggests limiting the supply path to 5 SSPs in its seller’s best practices.
It is also important to track the performance of each demand partner, like how they perform in the auction, how high they quote the price, and how often they win the impressions. If they are not bringing any improvements, replace them with potential demand.
This way, you can decrease the page loading times and other technical issues caused by underperforming demand partners. Eventually, you can improve the fill rate and ad revenue.
Define the optimal timeouts for demand partners
In header bidding, each demand partner gets a certain amount of time to respond to each bid request. This is typically called the timeout. The longer they take to respond, the longer the page has to wait for the ad. Therefore, set an optimal timeout in the wrapper.
- You can set optimal timeout by considering the location, device, network, ad unit, infrastructure, specific web pages, etc. These data vary with respect to different bidders. Finding timeouts based on these data prevents fast timeouts that leave out many potential demands.
- You can also install a proper timeout measurement system to find the problem source that prevents bidders from bidding before the timeout. The measurement system lets you observe the impact and change the setup to reach an optimal solution. Utilizing A/B testing at this stage is vital.
Floor price optimization
The floor price is a crucial parameter that needs to be optimized to get a premium rate from SSPs connected to your header bidding setup. It needs to be adjusted according to demand changes so that you won’t lose high CPM bids or end up with a decreased fill rate.
You can set static floors based on ad performance, historical data, and bidder performance. But these days, static floors are not viable due to the dynamic market shifts. Dynamic changes need dynamic flooring, which uses intelligent algorithms to change floor prices automatically based on real-time data.
For example, Mile’s Dynamic Flooring Module is an automated product that is made to work with your header bidding setup. It is a data-driven solution that predicts the highest price for your impressions and sets floors accordingly. You can use third-party solutions like these to optimize floors and your header bidding setup to increase ad revenue and yield.
Shuffle the order of demand partners
To create a fair auction environment, randomize the order bidders’ call for each impression and ensure that no demand partner faces the disadvantage of bidding last more often than others.
Pay close attention to user experience
Providing a good user experience on your website is of prime importance. Adopt the best policies for displaying ads, reduce page latency, and deliver the best ad sizes to improve the user experience.
While these are the quick tips that can help you optimize the setup and increase revenue, you can read more about the strategies to deal with low eCPMs in header bidding in detail here.
How to measure the performance of your header bidding set-up?
As we mentioned earlier, not all header bidding integrations are the same, and not all will have the same performance characteristics. Implementation is performing to get the most from your header bidding setup and know-how; you need to have the correct data. Let’s dive into a few tools and metrics you can use to help understand how your header bidding performs.
Header bidding Chrome extensions
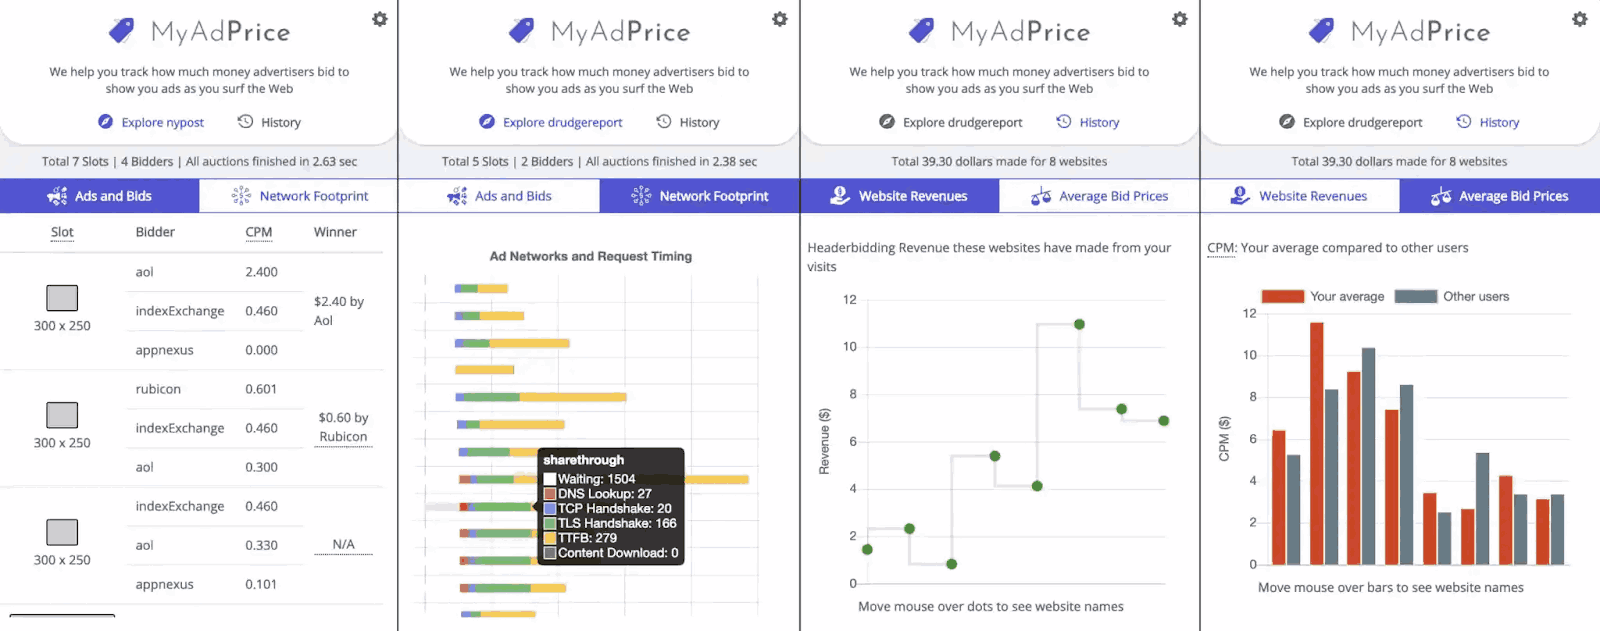
MyAdPrice:
When you are dealing with a high volume of ad impressions, it is essential to have a way to monitor what is happening in the background. MyAdPrice Chrome extension can help to refine your header bidding strategy by gaining better insight into how the ad partners work. In particular, it will help you understand:
- The bid price returned by the SSPs/ad exchanges for each ad slot on the webpage
- The winner of the auction and how much they bid to win it
- The ad revenue is generated from users. You’ll be able to compare the revenue generated for one visitor with another
- The time taken by the ad partners to respond in the auctions.
Headerbid expert:
Headerbid Expert was designed to be used by publishers to determine who the best demand partner is and those who aren’t responding within the specified timeout limit. Here are a few things that you can understand with this plugin:
- The latency caused by each demand partner
- Whether they are loading asynchronously and if they are blocking the webpage to load
- Whether all the demand partners loaded simultaneously
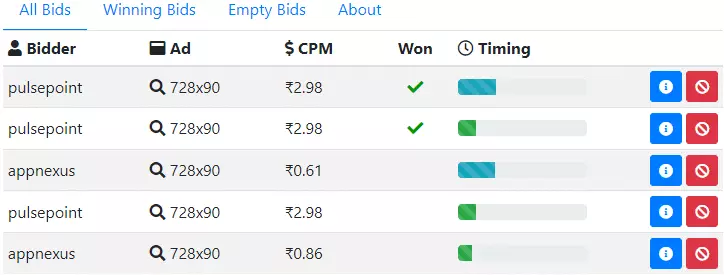
BidFilter:
The BidFilter plugin helps you assess the header bidding set-up by understanding:
- How much the winning partner bid and the winning ad slot
- How much time do the demand partners (whether they won or lost) take to return the bids
- List of demand partners that chose not to bid or either timed out
To predict the best header bidding extension, test them out. There are many extensions available in the market, but only a few can stand toe-to-toe with the likes of Headerbid Expert. MyAdPrice, and BidFilter.
We have tested a few more extensions and tools and shared our experiences and insights for you to follow when choosing a header bidder extension. You can find it here.
Third-party Header bidding analytics providers
Leveraging free extensions from Google Chrome is only one piece of measuring the success of your header bidding implementation. They give you valuable insights into demand partners (SSPs/ad exchanges).
But they don’t help in creating the complete picture. In the world of header bidding, timeout rates and eCPM are heavily discussed, but the reality is that there is a lot more to analyze than just these two metrics. You need to check the win rate, ad fill rate, bid rate, and more to get a complete picture of how your header bidding campaigns perform. This is where a third-party header bidding analytics provider comes in.
An analytics provider will handle most of the heavy lifting for you and provide in-depth insights. We’ve covered the most popular header bidding analytics providers in this blog post. These, of course, come at a cost.
Additional note: If you use Google Ad Manager reports to understand the behavior of SSPs participating in header auctions, ensure that there’s no discrepancy between your header bidding partners analytics and Ad Manager reports. An inaccurate report can cause you to make wrong decisions while optimizing your setup. Here’s an article that will help you reduce discrepancies between the two reports.
How to test your header bidding set-up?
Header bidding testing is essential. If you don’t test, you are stuck in the dark about what is going on. But what should you consider while testing? Where should you start? In general, there are three important things to analyze:
- Your demand partners (SSPs/Ad Exchanges)
- Your Prebid wrapper, and
- Your ad server
Here’s a detailed blog post that will answer all your questions. It is recommended to give some time to the new set-up and start with testing after a few days.
What’s Next?
The header bidding technology has gone through a tremendous growth phase in the past few years. No longer just hype, publishers are now relying heavily on it to get maximum yield from their inventory. However, most of the publishers in the industry have deployed header bidding as a mere add-on to their existing stack. They lack proper technical infrastructure to accelerate performance for their advertisers.
For this reason, we have been relentless when it comes to improving header bidding performance for our publishing partners. Not only have we created a wrapper with unique features, but we also provide ad-ops support for publishers to maximize their ad revenue by implementing various practices.