Header bidding has become increasingly popular among publishers in 2021, with more than 70% of websites implementing this monetization solution. Despite this trend, some publishers have reported limited success in generating substantial revenue from their header bidding setup. The cause for this could be attributed to various factors such as unsuitable demand partners, inappropriate ad targeting, and incorrect ad sizes in the header.
Therefore, publishers must periodically test their header bidding setup to ensure optimal performance. In this article, we will guide publishers on analyzing and testing their header bidding setup to maximize revenue from their header bidding partners.
Table of Contents
How to Analyze and Test Header Bidding Setup?
Let’s start with the basics. Are you even sure if the Prebid script is running on your website? If not, then type pbjs_debug=true in the browser’s Console. If the output is false, there are some issues with your header bidding script; you might need to figure out that before. If true, let’s move to the next task, i.e., checking the Prebid version.
It might seem like a skippable step. But it is very important to integrate the latest version of Prebid, especially for independent publishers with in-house setup. Prebid’s open-source platform keeps updating the features and services of its wrapper and adapter, such as support for user ID modules, price floor modules, and privacy law modules.
So, to leverage the offerings and do testing based on the trends, you should start by checking the version of Prebid running on your website. It doesn’t take much time and can be done by typing pbjs.version; command in the browser’s Console.
– Analyzing Wrapper
Wrapper plays a crucial role in header bidding as it is an intermediary between the ad server and demand partners. The auction starts via Wrapper, which determines the winning bid and then passes it to the ad server.
How do you verify and configure the Prebid or header bidding wrapper?
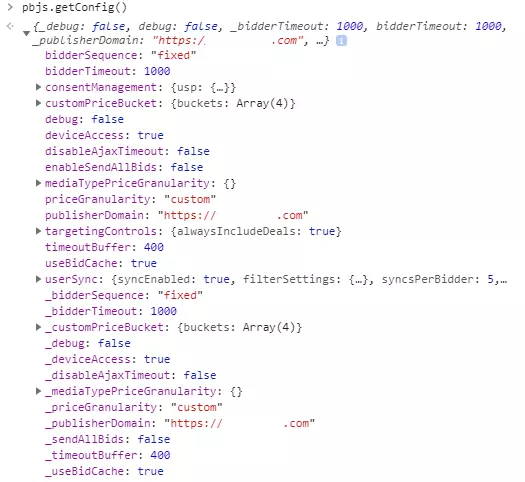
To analyze the performance of the wrapper based on the current setup of bidders and ad server, you need to use the command pbjs.getConfig() in your browser console. By using this, you can find out details such as:
- Universal timeout rate for all bidder partners,
- Price buckets and type of price granularity,
- Integrated Consent Management Platform and its timeout,
- S2S configuration details (if available).
Many Prebid wrappers call demand partners alphabetically. But it is said that the best wrappers have the tendency to call bidders in random order. So, you can even check the calling method of bidders via this command.
While testing the header bidding wrapper, you need to consider two factors,
- Test with the universal timeout rate.
- Test with price granularity.
- Test with the universal timeout rate. Since you know how long your bidder partners take to return a bid response, you must ensure they all get sufficient time to respond. The whole purpose of running header bidding is to give equal opportunity to all partners.
- Test with price granularity. By default, many Prebid wrappers are configured to the “Med” price bucket with a value of $0.10. You can also set price buckets to “Low” and “High” with values of $0.50 and $0.01, respectively. Ensure the price granularity of the wrapper matches your line item setup in Google Ad Manager.
While testing or making changes in the price buckets, ensure the wrapper is configured to a higher granularity so you don’t leave money on the table. Let’s understand this with an example. If you’re using $0.50 price granularity, if a bidder responds with a bid of $1.89, it will be rounded to $1.50 and hence will lose the auction to an ad server line item with a CPM of $0.60.
– Analyzing Demand Partners
The header bidding setup is nearly impossible without knowing demand partner metrics, making decisions, and starting A/B testing. To analyze the bidders, you need to check:
- The number of bidder partners – those returning the bids and the bidders who got timed out or couldn’t respond with bids for some reason.
- Individual timeout rate and bid value of each bidder partner.
- Price granularity of line item targeted by the bidder.
- How long are the bids considered valid?
How to Analyze Demand Partners?
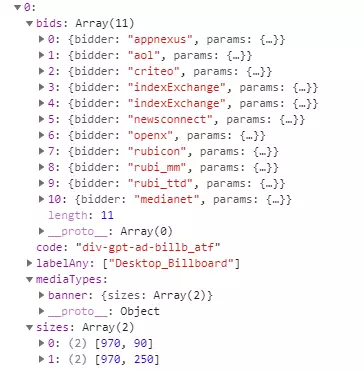
To start with the analysis, open the browser’s console and type pbjs.adUnits command. As an overview, it will display the total number of ad units where you’re running the Prebid auction.
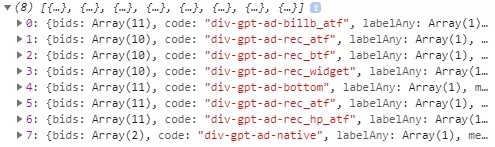
You can check the list of demand partners associated with a particular ad unit by clicking on ➤ and check the number of demand partners who accepted the bid requests.
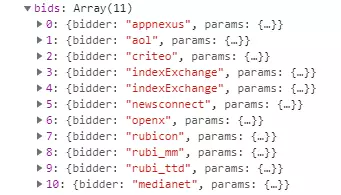
When you expand a particular ad unit, you can have a combined view of media types, ad sizes, and bidders associated with the ad slot. We clicked on the first ad unit (with 0 indexes) and found 10 demand partners who were supposed to bid on the ad unit.
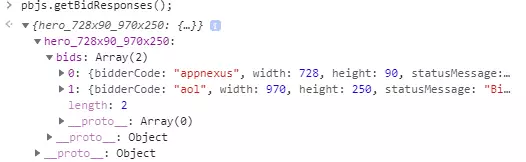
Once you know the bidders called for the specified ad units, you can check the demand partners who responded with the bid response. This can be done by using the command pbjs.getBidResponses();.
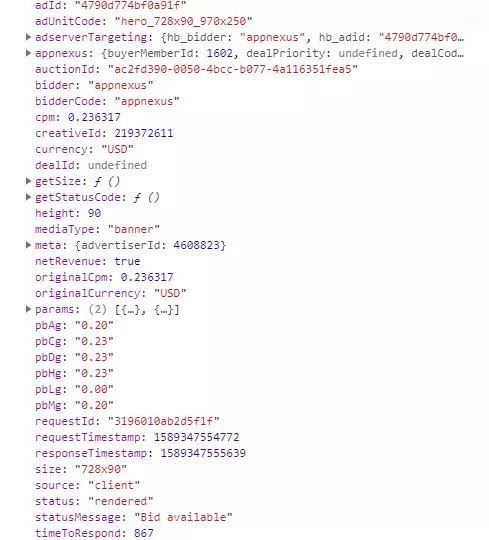
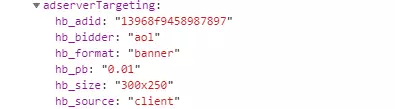
To view the auction details, such as CPM rate, type of implementation (server or client-side), media type, timeout of bidders, etc., click on the ad unit you want to view. Here’s a sample of how it looks:
You can see that only AppNexus and AOL returned the bid response for the ad unit. Although AOL returned the bid response, it lost the auction due to lower CPM. Additionally, you can also check the bidder partners who didn’t respond within the specified time. See the example below, where the table has a list of winning bidder partners as well as others. Here’s how to do it.
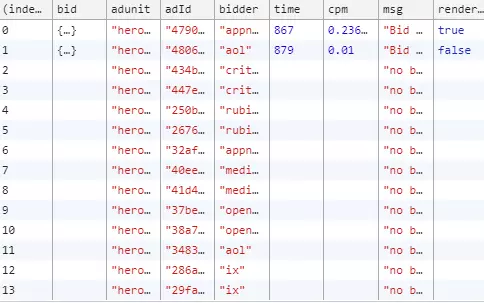
Additional Tip: If you want to know about winning bidder only, then use the command pbjs.getAllWinningBids(); in the Console.

The same can be checked by the BidFilter extension. However, the results will not be as accurate as the ones you find in the browser’s Console.

While testing Demand Partners, you need to consider a few things, like,
- Bidder partner’s timeout rate & bid rate.
- Try testing them for their respective media types and see the results in overall revenue.
- Try calling the demand partner before and shift the others back when a demand partner is always the last one to be called to return the bid.
- If you have a bidder partner whose timeout rate is somehow acceptable but it has a very low bid rate, then adding such demand partners might not be useful to your inventory. So, why not replace it with a bidder who can bid on the specific inventory and see the results?
- If some bidder partners have a good win rate or bid rate for a specific media type (banner or video), try testing them for their respective media types and see the results in overall revenue. Ensure that they have the most optimal timeout so that they don’t cause latency and negatively affect the User Experience.
- Test with the sequence of calling the demand partners. If there is a demand partner who is always the last one to be called to return the bid, try calling it before and shift the others back. See how this helps in increasing revenue.
– How to Analyze Ad Server (Google Ad Manager)?
A major chunk of publishers is using Google Ad Manager as their ad server. So, the best and easiest way to analyze the ad server setup is to use Google Publisher Console. You can run the tool by typing googletag.openConsole(); in Console, view the webpage ad slots. The Console can help you to analyze:
- Ad targeting of the Prebid line items,
- Latency (if) caused by the bidder partners,
- Key events include fetching web page ads, and many more.
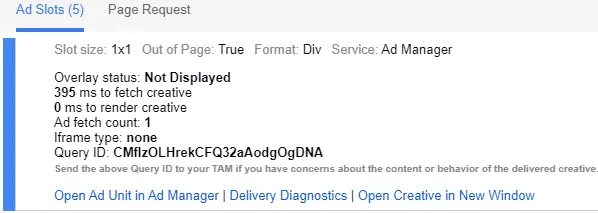
Further, you can view the demand partner associated with the ad unit and if it won the auction via Delivery Diagnostics. First and foremost, we suggest you check the line item targeting criteria in Google Ad Manager and the Prebid setup. The reason is – sometimes a mismatch in line item setting can prevent an eligible line item from delivering the creative and cause various other issues in the ad campaign.
To ensure that targeting criteria is error-free, click on Delivery Diagnostics, which will open a window like this:
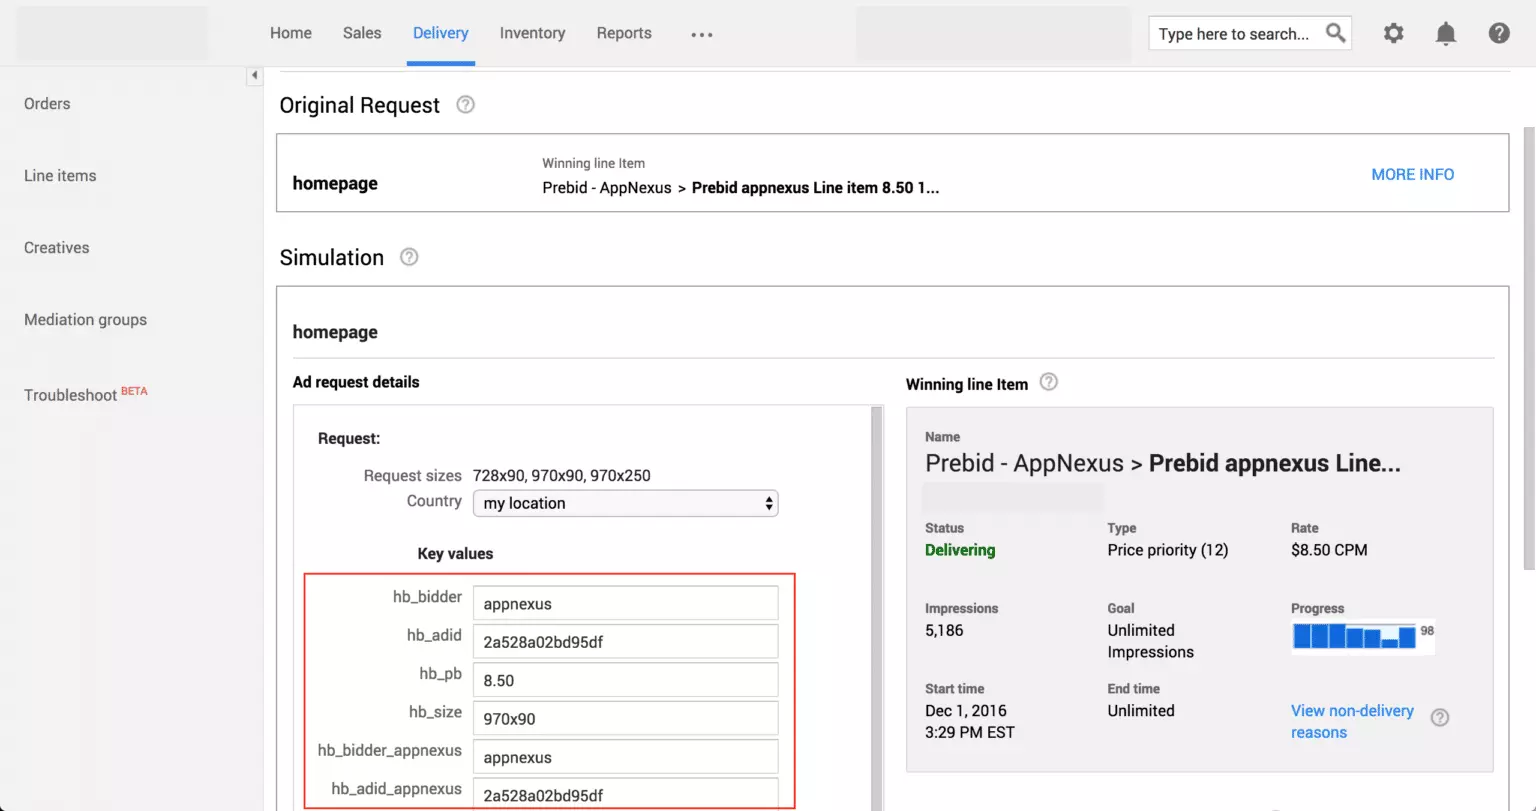
Now, you can compare it with Console’s results:
Similarly, this can be done for Prebid line items that lost the auctions. Check if the price granularity, ad IDs, and other parameter matches. Once you have analyzed the metrics and you are sure that the current setup has no errors, it’s time to move to A/B testing.
Test with ad server load time. You can use Chrome extensions like Headerbid Expert, Bid Filter, etc. Sometimes, Google Ad Manager gets timed out as the first header bidding gets delayed. If any bidder is taking more than the desired time or blocking the loading of the ad server, change the bidder partner, and test with a different one.
What to Consider While Testing the Header Bidding Setup?
Prebid debugging tools, various analytics reports, and browsers’ extensions can help understand your ad stack’s performance. But a publisher has to consider a few things while testing header bidding. For example:
- Being the website owner, user experience should always be on top of everything else. During the testing phase, ensure that there is no latency in bid response and ad creative rendering.
- The ad-tech market keeps changing from Q1 to Q4, and seasonality affects the CPMs of ad impressions. So, don’t rely entirely on the CPMs to evaluate the performance of header bidding. Be open to different strategies and also consider metrics such as bid rate, win rate, fill rate, etc.
- Leverage the analytics tools provided by header bidding partners. Insights given by these tools also help a lot in holistic optimization.
What’s Next?
Testing the header bidding setup is crucial to ensure you get the most out of their header bidding partners. By analyzing and identifying areas of improvement, you can optimize ad targeting, demand partners, and ad sizes to increase revenue.
As more websites adopt header bidding, you must stay ahead of the curve and maximize the ad earning potential. So, don’t wait any longer; take the time to test your header bidding setup today and see the difference it can make in your revenue.