AMP — Accelerated Mobile Pages — has transformed the way publishers think about mobile user experience. It’s nothing new. In fact, AMP was announced back in October 2015 and we have been talking about it for a while.
However, when it comes to leveraging the AMP framework to build mobile-friendly web pages, you might need help, especially if you have little experience in setting it up to WordPress. So, in this article, we’re going to help you implement Google AMP on your WordPress CMS with step-by-step instructions.
Table of Contents
Step #1: Install an AMP WordPress Plugin
If you don’t have a lot of technical expertise, one of the simplest ways to implement Google AMP on your WordPress website is by using plugins. Let’s start off with the 2 most recommended plugins for amp implementation: AMP and AMP for WP – Accelerated Mobile Pages.
1) AMP
Unlike a lot of AMP plugins, AMP is an official plugin launched by AMP Project Contributors and has a short but straightforward installation process. This plugin allows you to quickly set up your website for AMP with a minimum of fuss.
While the AMP plugin does a good job, there are some situations where the default settings won’t be enough to meet your demands. Besides, you cannot set up AMP ads with this plugin. In such cases, an alternative plugin i.e. AMP for WP – Accelerated Mobile Pages has more features.
2) AMP for WP – Accelerated Mobile Pages
AMP for WP – Accelerated Mobile Pages is a well-crafted plugin that offers better customized solutions. It has tons of features and is constantly being improved by its developer. For example, you can add your custom CSS, pick where to display ads, optimize for viewability, and more. Let’s get started with the plugin.
Step #2: Setup AMP Page using AMP for WP plugin
Follow the below steps to set up AMP pages:
- Select the type of website you have: Blog, News, and Local Business. If the list doesn’t include your category, then select Other and enter your website type. Now, select where do you need AMP: Homepage, Posts, Archives, or Pages.
- In Design and Presentation, and Analytics Tracking, enter the required information such as your logo and analytics’ tracking ID.
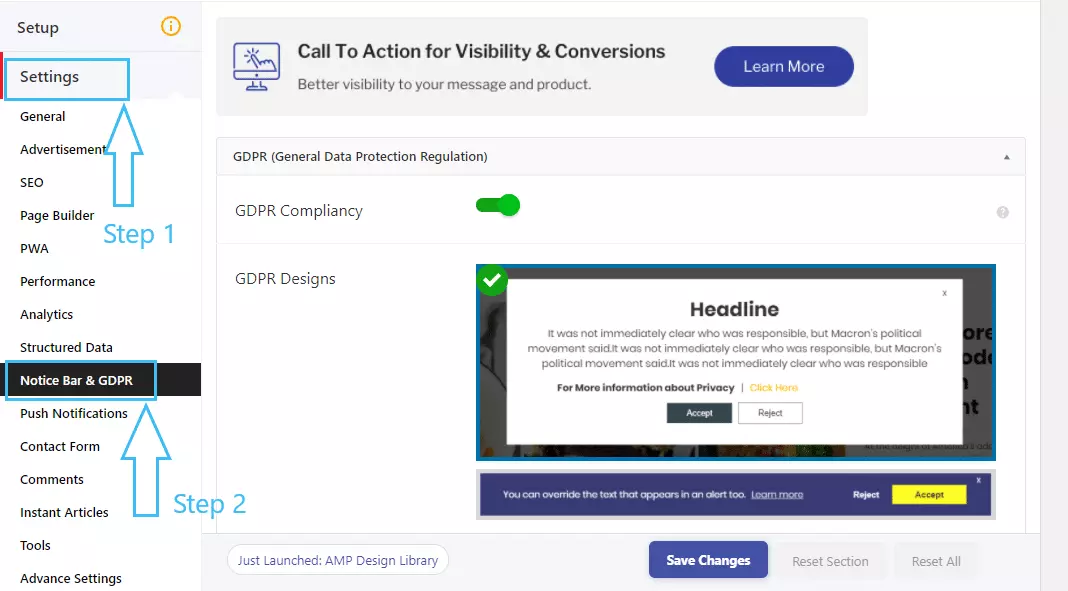
- If you’re collecting data from EU users, enable the Cookie Notice Bar or GDPR*. Please note that you can enable either a cookie bar or GDPR.
*GDPR and cookie messages can be edited in the Settings section of the AMP plugin.
Step #3: Setup AdSense ads on AMP pages
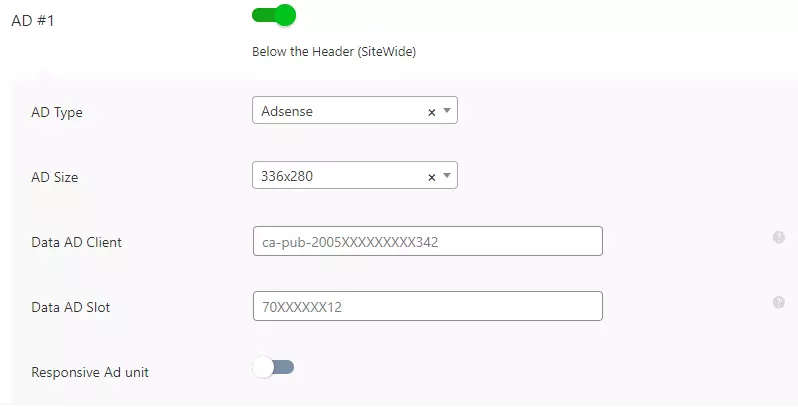
In the Advertisement section, you can add 6 ads on different locations e.g. Below the Header, Below the Title, etc. For example, you want to show an ad below the header, you can select AD #1. Then, you can enter the ad details such as ad size, and ad type. Optimize for Viewability and add the label for Sponsored content.
But the plugin has a restriction. You can only add ads from AdSense or MGID. If you want to serve ads from Google Ad Manager or other ad partners, you’ve to install a plugin WP Quads. The WP plugin also allows setting up native ads from Outbrain, adding custom add code, and more.
Step #4: Install WP Quads and Setup Google Ad Manager ads
Follow the below steps to serve ads via Google Ad Manager on AMP pages:
4.1) Create an ad
Setting up ads in WP Quads has three phases: Configuration, Targeting, and Publish. Let’s say you want to start with Ad Manager ads. So, select GAM and enter the required details:

Enable the Responsive feature and AMP Compatibility if required. Now, the next step is to set-up the Targeting for the ads. You can select the position to serve the ad and add targeting parameters based on the post type, category, tag, post format (link, image, audio, video, etc.). Click Publish to save the settings.
4.2) Advanced settings for the ad
In the ‘Advanced setting’ section, you can add an ads.txt file, enable lazy loading, TCF 2.0 integration, and more. Let’s start with the first option, i.e. ads.txt. So, if you don’t have an ads.txt in place, you can simply create one by using this tutorial. Now, add the txt file by using the settings button in front of the ‘ads.txt – Automatic Creation’.
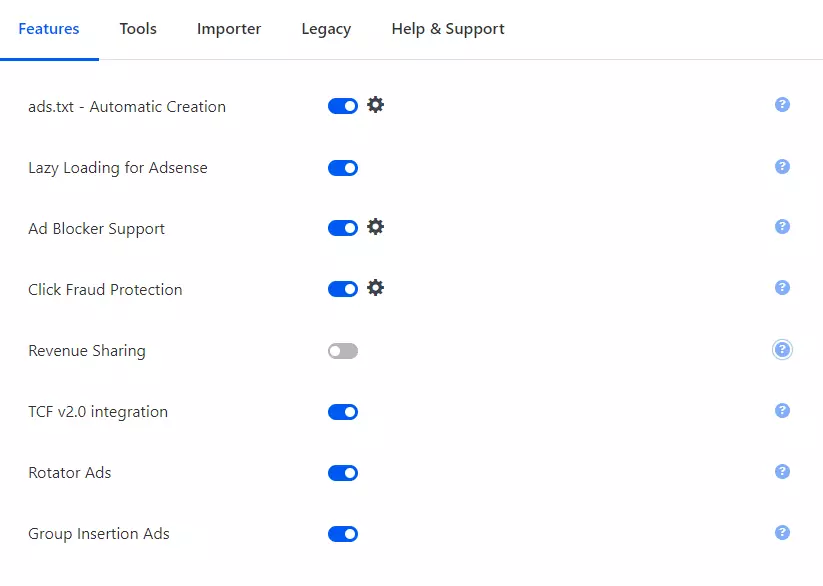
Ad Blocker Support can help you serve a notice to the users with ad-blockers in their web browsers. With this feature, you can display a message or pop-up like this:

Revenue Sharing is for the publisher who wants to divide the ad earnings (from AdSense) to divide amongst the Author and Administrator whereas Click Fraud Protection can help you reduce double click penalty on the website by defining how many times users can click on an ad.

Rotator ads is a paid feature of the plugin that allows you to serve selected ads in rotation based on ‘page reload’ or ‘auto refresh’. As the name suggests, On Reload serves the ads in the rotation when the user reloads the webpage. On the other hand, Auto Refresh will change the ad after a specified time interval*.
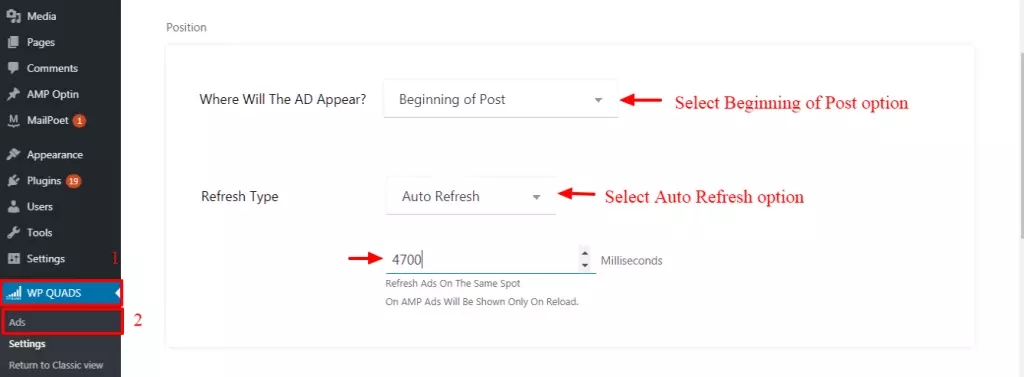
Image Source: WPQuads.com
Side note: AdSense doesn’t encourage ad refresh. Hence, it is recommended not to enable it for the network. Check out the ‘do’s and don’ts of ad refresh’ before getting started with it.
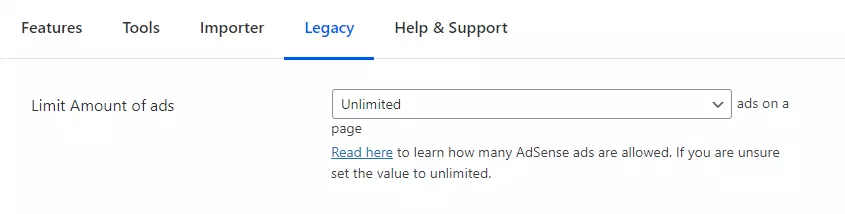
At last, save the settings. Now, check how many ads you’ve set up for each page because if you don’t, the plugin will serve all the ads by default. And this can affect the user experience negatively. To set it up, go to Legacy in the plugin and select the number of ads you want to display.
Step #5: Set-up Google Analytics
As setting up ads and analytics are two different things, you can alter the sequence, and set up the ads followed by analytics, or vice versa. We’ve chosen the first option. With AMP for WP plugin, you can add multiple third-party data analytics.
For example, if you’re using Chartbeat, and also want to integrate Google Analytics on your website (this is a must if you want to better understand your site’s traffic), you can add both tracking codes manually. Go to Setup > Analytics Tracking. Or you can go to Settings > Analytics. Select the providers, add their respective IDs, and you’re set to go.

Step #6: Validate your AMP website and debug the errors
Deploying a well-configured AMP website on WordPress and validating it isn’t tricky. Google has provided two options that can help you ensure the AMP version of your website is accessible to the users on SERPs. The first option is to use Chrome’s AMP Validator extension, and the second option is running the website through AMP Test.

Once you have your AMP pages validated, then you can move to the troubleshooting part if there are any errors. To debug AMP-enabled webpages, you can use Chrome’s Developer Tools. Here’s how to do it:
- Enter the AMP-enabled URL in the search bar, followed by ‘#development=1”. It will look like this: https://www.example.com/amp/#development =1 or https://www.example.com?amp/#development =1.
- Now, click on More tools > Developer tools, and go to Console. If there are no errors, you’ll see a message “AMP validation successful”.

In the worst-case scenario, you might see a few errors in the browser console. For example, invalid use of AMP tags, prohibited use of HTML tag, AMP markup missing, and more. To remove such errors, you can refer to AMP documentation here.
What’s Next?
Developing a mobile-friendly design for your website is no longer optional. Your website pages must load fast, regardless of the device people use to browse the site. An AMP-compatible version of your website not only helps you rank better in SERPs but also boosts user experience. Thus, page views and ad impressions. So it’s worth experimenting with AMP.
Still, struggling with speeding up your website or Implement Google AMP on WordPress or on other CMS? AdOps Quick Fix is for the right place for you. Be it website optimization or ad optimization queries, ask us the questions and we’ll help you find the solution.
Learn how to implement header bidding on wordpress.