According to a report published by Business Insider, native display ads revenue will make up 74% of total US display ad revenue by 2021 (Src).
“We forecast that US advertisers will spend $43.90 billion on native display ads this year, a 24.6% year-over-year growth. In 2020, we expect US native display ad spend to grow 20.2% to $52.75 billion.”
– eMarketer.
Native advertising has been leveraged by many premium publishers including Men’s Health, Forbes, BuzzFeed Inc., etc. as the ads are more publisher-friendly and look like the regular content present on their website. As a result, native ads look less like ads and help publishers to reduce banner blindness to some extent.
By the mid of 2017, Google enabled publishers to place native ads through its advertising platforms i.e. Ad Manager, Ad Exchange, and AdSense (Src). So, why invest in a separate native ad platform when you can serve native ads through Google’s ad server. For a mid-sized publisher, Google Ad Manager is one of the most reliable and cost-effective servers to start native advertising with.
So, let’s begin with the basics and try to find out how can a publisher implement Google DFP native ads on a site.
Table of Contents
How Native Ad Serving is Different From Banner Ad Serving in Google Ad Manager?
As defined by Google, a native ad is designed by a publisher according to the layout of a web page. In contrast to banner advertising where advertisers return the complete ad with a fixed size, native ad creatives are designed by Google Ad Manager (DFP) after collecting different structured components (Image, Headline, Clickthrough URL, Ratings, Body Text, Ad Badge/logo, etc.) from advertisers.
- An advertiser returns a complete ad with a fixed size to be displayed on a publisher’s inventory.
- Publisher’s ad server (i.e. Google Ad Manager) receives the creative via a third-party ad server and serves the ad without making any changes.
- Google Ad Manager displays the same ad as sent by the advertiser’s server to the visitors.
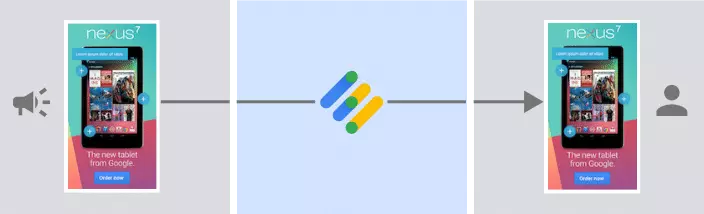
Image Source: Google.
In native advertising –
- Here, the third-party ad server returns different components of an ad to the publisher’s ad server (DFP).
- Google Ad Manager collects the components and generates an ad for web and mobile app that looks like the organic content of the page/screen-in-view (with the help of native styles).
- Then, it displays a native ad that is appropriate for the user.

Image source: Google.
What are the Components of a Native Ad in Google Ad Manager?
Usually, when you break down a native ad, you’ll find three major components.
- Ad attribution,
- AdChoices overlay, and
- Image, text, and other elements.
Ad attribution:
An ad attribution is required to be present in a native ad to ensure that a native ad is identifiable as advertising before users visit the advertising URL and don’t misunderstand it for the website’s organic content. Therefore, publishers must display “Ad” or “Advertisements” on the ad creative.
AdChoices Overlay:
AdChoices overlay is controlled by the buyers and present in the upper right hand of an ad. It is used by advertisers to target visitors and bring back to their website. This overlay consists of a URL and provided by the advertisers in the bid response.
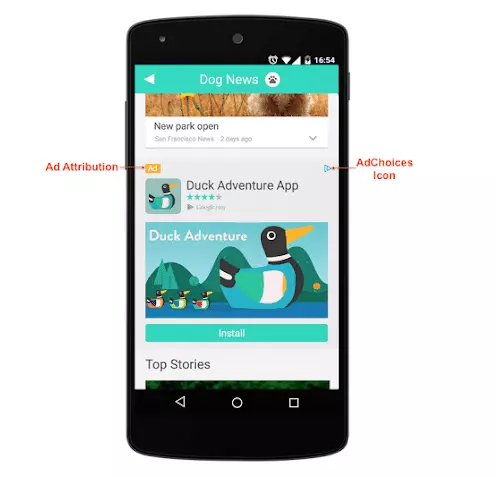
Image source: Google.
Image Elements and Text Elements:
A native ad consists of a thumbnail, brand logo, or creative content-type Icon (optional). Also, there should be a headline and description in a few words (there are limitations and extra characters will be truncated). Publishers are allowed to scale the image element without changing the aspect ratio, or they can crop the image by up to 20% in one dimension.
Although these are the essential components of a native ad, it can also have visible call-to-action (CTA), star rating icons, etc.
Coming to the formats of native ads, Google Ad Manager has defined two categories:
- Standard Native Ad Formats that are used in Programmatic Guaranteed, Preferred Deals, Ad Exchange, AdSense, and Open Bidding (i.e. Exchange Bidding), and
- Custom Native Ad Formats that are used by publishers who prefer non-programmatic advertising i.e. direct deals, based on the priority order of line items (such as sponsored, price priority, bulk, etc.)
Further, Standard Native Ad Formats are divided into four categories –
- App Install,
- Content,
- Video Content, and
- Video App Install.
Note: It is required for App Install native ad to have an app icon and it can include play store icon, price of the app, etc. Also, a Video native ad should have a video field that should contain all mandatory components to playback the video ads.
Custom native ads are used by the publishers who want to define their variables for native ads. Here, variables* of the native ads are provided by the trafficker and using these values, Google Ad Manager generates an ad.
*Variables denote various elements of the native ad. Examples include the headline, body, image, etc. Publishers go with custom native ads when they need to define variables that aren’t available in Google Ad Manager by default.
How to Create and Run Native Ads via Google Ad Manager?
A publisher has to go through the following steps to create and run native ads. We’ll dive into the specifics while discussing the steps later.
Step 1 – Create Native Ad Styles (native ad templates).
Step 2 – Create native ad units.
Step 3 – Create line items and add creatives.
Step 1 – Create Native Styles (native ad templates)
To run native ads, you are required to create styles (to put it simply, templates) that define how your ads will look exactly.
- Sign-in to Google Ad Manager (DFP) account.
- Click Delivery > Native > New Native Ad > Single Ad.
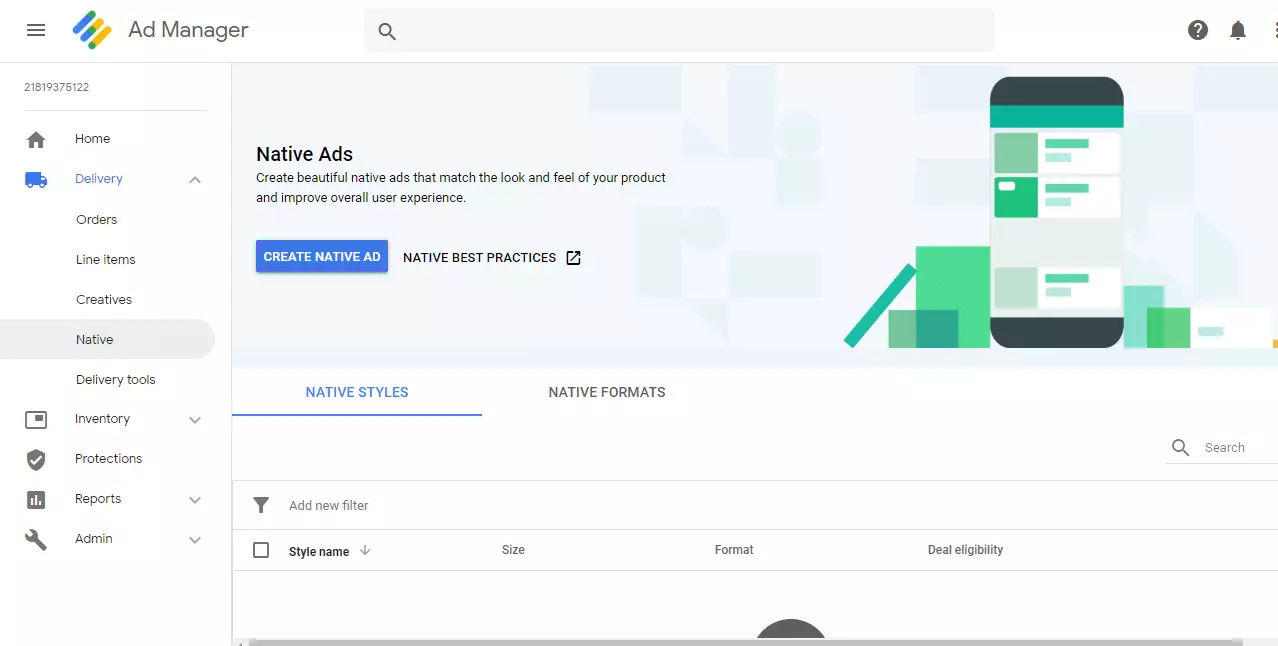
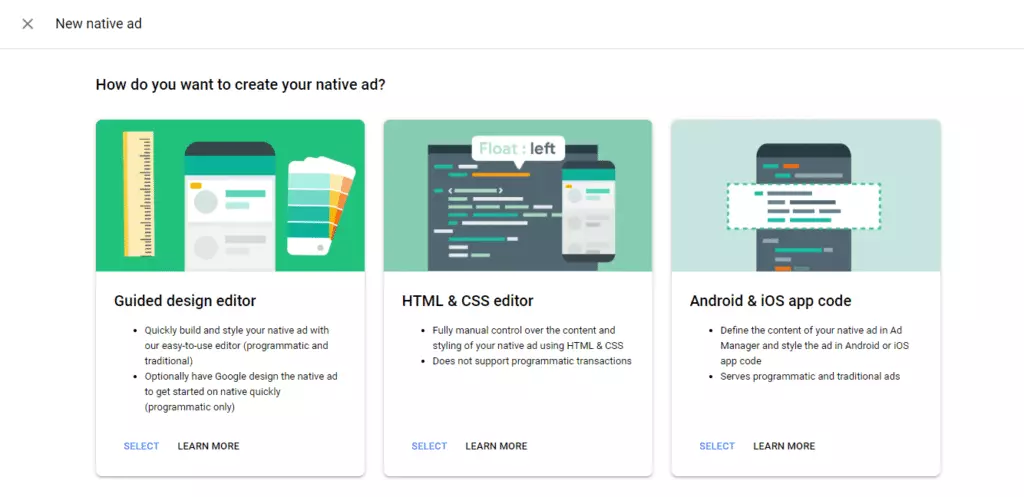
- Then, select the method to create a native ad out of the three choices available – Guided Design Editor, HTML & CSS Editor, and Android & iOS Code.
If you want to start with predefined elements for the native ads, then go with the Guided Design Editor. Or, if you want to create a native ad from scratch, then pick HTML & CSS Editor. Apparently, the Android & iOS app code is for app publishers. Once you pick the option, you can name the native style.
For Guided Design Editor
#1 – Define Ad Setting
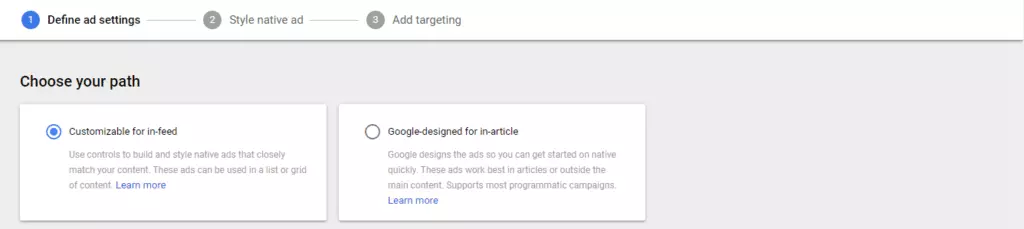
- In the Choose your path, select either of the two options – Customizable for in-feed or Google-designed for in-article. With Customizable for in-feed, you can style your native ad that blends in with the in-feed content. Also, you can make Google do this for you by enabling Let Google to suggest an in-feed style. Google will scan your web page and create a native ad that matches the layout of the page. However, if you select the latter, you can only serve programmatic in-article native ads.
- Then, go to the Define ad settings. Select the Ad size – either Fluid or Fixed. Fluid ad size enables the Google Ad Manager to automatically resize the ad creative according to the inventory dimensions. Fixed-size will display the ad creative as defined by the pre-defined ad sizes (300×250, 728×90, 970×250, etc.)
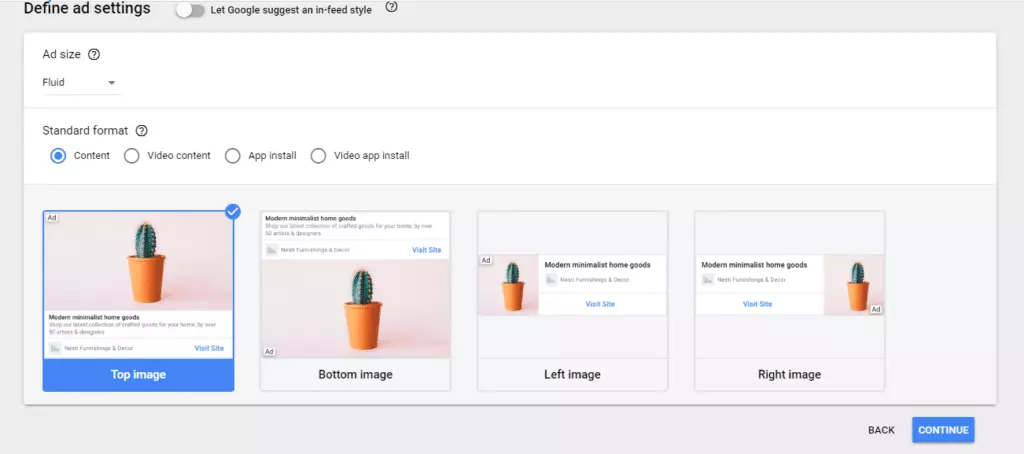
- Select the Standard format. Here, you can select one out of the four types i.e. Content, Video Content, App Install, Video App Install.
- Then, select the image layout (Top image, Bottom Image, Left Image, or Right Image) that matches your website’s look, and click Continue.
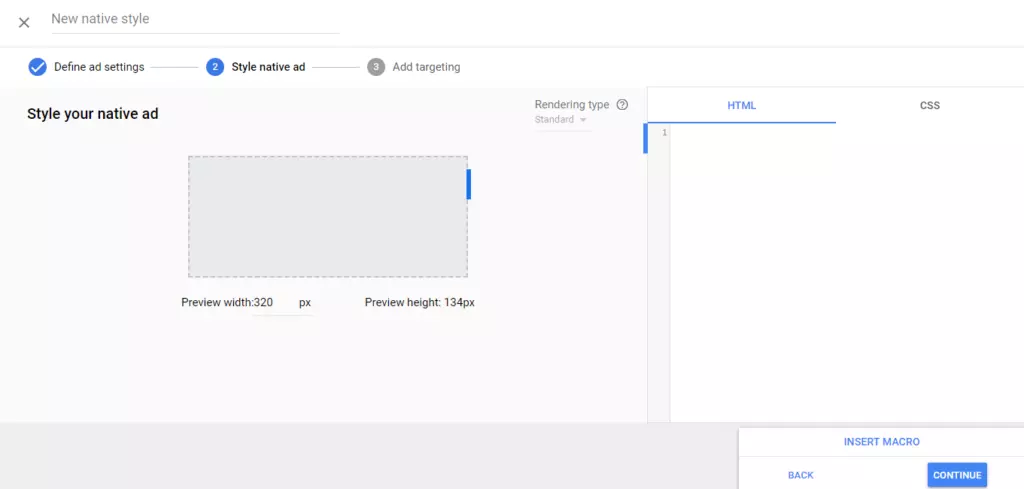
#2 – Style your native ad
This step helps Google Ad Manager to handle the rendering of a native ad based on the native style you specify. Also, you can design your native as you want to display across all screens. So, follow the steps to style your native ad in Google Ad Manager –
- Go to the Preview width and Preview height and enter the right size you want for your native ad.
- Then, go to the right menu bar. Here, you can alter the Font, define Image Size and Padding, Image Title, Advertiser Logo or Name, etc.
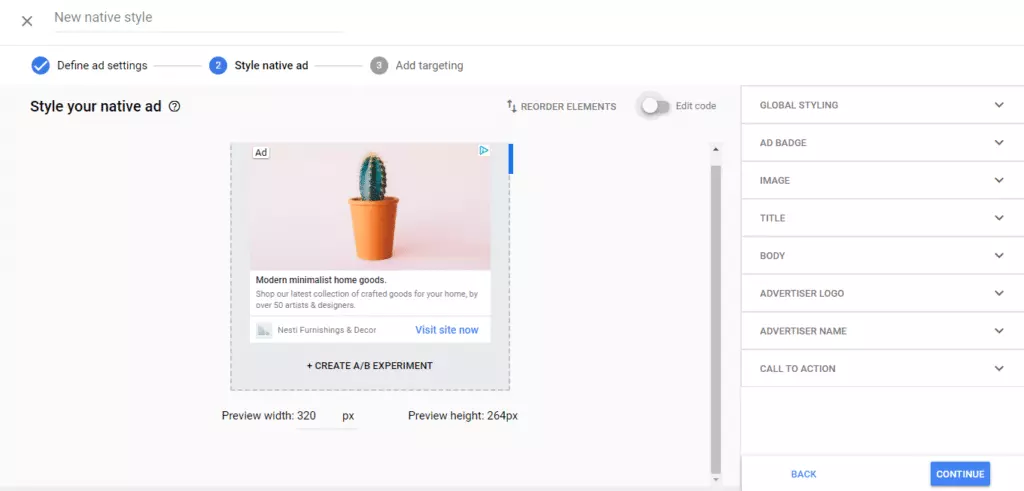
- Then, click Continue.
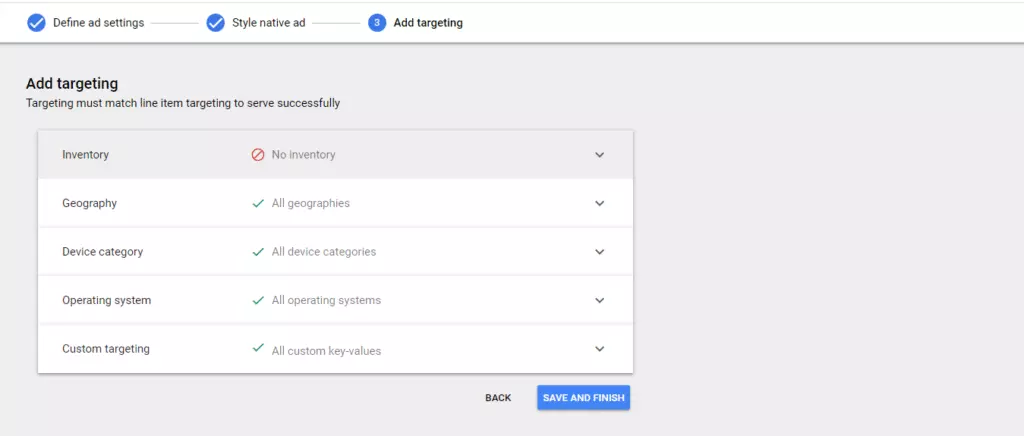
#3 – Add Targeting
In this section, a publisher needs to set up the targeting* of native ad inventory. You can target a native ad line item based on Geography, Device category, Operating system, and Custom targeting. Make sure that Inventory is selected as Native. After setting up all targeting parameters, click Save and Finish to finalize your native ad.
*The targeting here should match with line item targeting that will be created later.
For HTML & CSS Editor
Select the HTML & CSS Editor if you want to create a custom native ad and, follow the below steps –
#1 – Define Ad Setting
- Select the Ad size – either Fluid or Fixed. Fluid ad size enables the Google Ad Manager to automatically resize the ad creative according to the inventory dimensions. Fixed-size will display the ad creative as defined by the pre-defined ad sizes (300×250, 728×90, 970×250, etc.).
- Then, next is Custom format. Here, select New format. Enter a Name for the format and a Description (Optional Step) in a few words. An app publisher can provide the app name in this field.
- Then, click the Add Variable. This will open a pop-up on the right side of the screen where you can add details to various variables such as File, List, Number, Text, and URL. These variables are used by the publishers to control the interaction of native ads when a user views the ad.
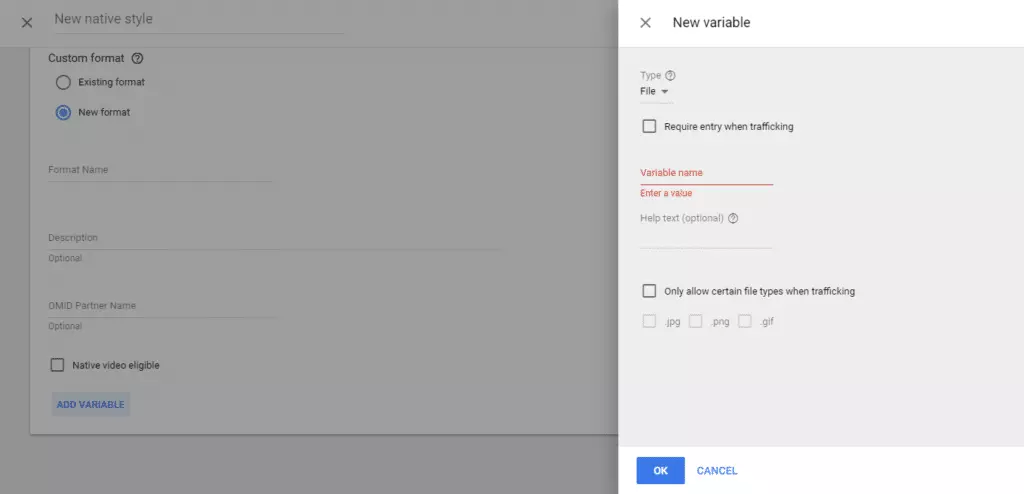
- Then, click Continue.
#2 – Style native ad
- Update the Preview width and Preview height settings to check how your ad looks in different screen sizes.
- Then, go to the Rendering type if you want to optimize the native ads for AMP pages. There are three options to design a native ad here –
- Standard – This will optimize the ad for all – desktop web, mobile web, and mobile app.
- AMPHTML – Use this to design the native ad for AMP content.
- Standard and AMPHTML – With this, native ads will be optimized for both.
- If a publisher chooses HTML & CSS Editor to design native ads, he/she has to add separate code to produce the different versions of native ads in the HTML and CSS sections.
- At last, click Continue.
#3 – Add Targeting
This step is similar to what you have done in the Guided design editor. Just make sure that the targeting options chosen on the page with native ads should match with the line item targeting. In case, if you don’t know how to set up targeting for line items, just head over to our guide.
Now, let’s talk about the third and last method i.e.
For Android & iOS App Code
This method involves only defining ad settings for Android & iOS native app ads, everything else is taken care of by Google Ad Manager itself. So, if you’re an app publisher or a developer, then follow the steps given below to define a native ad.
- Enter the Name for the New custom format, Description, and OMID Partner Name. Add Variables as you did for HTML & CSS Editor.
- If you’re serving an ad to Ad Exchanges, skip to App implementation. Here, you can import and use Google Mobile Ads SDK, and review the guidelines of the native ad while editing app code.
- Then, click Save and Finish.
That’s it. Now, let’s see how you need to create ad units, line items, and add creatives to serve native ads on your site.
Step 2 – Create Native Ad Units
As we have already talked about how to use different editors to create native ads, the next step is to serve them by creating ad units and line items in Google Ad Manager.
In case, if you need help creating ad units, here’s an article that will help you to do the same. Under sizes, add “Fluid or Fixed (any standard size you want)” depending on whether you want your native ads to have fluid slots or not. The ad unit setup is the same for all the native ad campaigns you’ll run – be it programmatic guaranteed or any other non-guaranteed campaigns. You just have to follow the usual setup.
Step 3 – Create Line Items and Add Creatives
Though creating line items follows the usual steps, you need to select the size based on the campaign you’re looking to run. That is, you’ll be adding sizes a bit differently for guaranteed and non-guaranteed campaigns. Similarly, to make banner ads compete with native ads, you’ll be appending the sizes of line items. We’ll take you through the exact steps in detail for each scenario in a moment.
#1 Native Ads Via Programmatic Guaranteed Campaign
For running native ads via a programmatic guaranteed campaign, you need to follow the steps described below:
- Name your native line item.
- For PG, the inventory size should be the same as the name you’ve given to the native style in step 1. For instance, if you’ve created a native style named ‘in-feed desktop’, then you need to enter the same in the “Inventory Sizes” field and nothing else.
- Now, you can fill in additional details that are optional such as Labels, Comments, etc. In the next section i.e. Settings, select the priority as you intend (sponsorship or standard). And, Save.
Now, let’s add creatives.
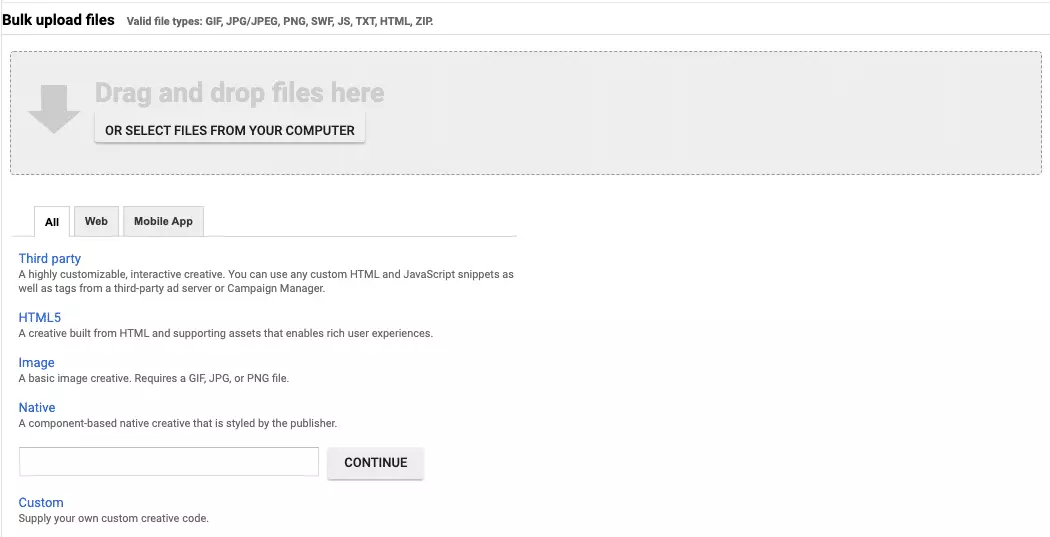
- Select the tab Creatives next to Settings.
- Click on New Creative > Native > Select Native Style i.e. name of the native style you entered while creating it. After this, select Native in the Target ad unit size menubar. This will open a box on the same page where you have to enter details such as Headline, Body, etc., and upload the image. As it is a PG deal, you can get the assets of an ad from the advertiser for trafficking here.
- Then, click Save. After this, Approve the ad and you’re ready to native ads through the DFP ad server.
#2 Native Ads Via Google Ad Exchange
If you’re looking to serve native ads by getting the demand from ad exchange, you need to follow the same steps with one exception – In the “inventory sizes”, you need to add “Native (Native)”.
Line items:
Add line item > Inventory sizes > enter Native (Native) > set priority as required (Ad Exchange) and save.
Adding creatives:
When it comes to creatives, you need to select add new creative and click Native. In the next step, you need to add the native ad format that has a native style in place*. That is, if you have created Native Style for content ad format, you need to add “content” here.
*Remember, we’ve selected the format (Content/Video Content/App Install/Video App Install) while defining the ad set in the first step.
#3 Make Banner Ads to Compete With Native Ads
Yes, you can make banner ads and native ads to compete with each other and serve whichever is paying you the highest. In fact, if you are planning to serve native ads via ad exchange, Google suggests enabling banner ads to compete with native ads to ensure optimal revenue and performance.
Line items:
From creating native style to a native ad unit, everything is the same, while creating a line item, you need to add both “Native (Native)” and banner sizes (whatever native ad size you want to compete with native ads) in the “Inventory Sizes” field.
For example, you’ll add a new line item, select inventory sizes as Native (Native) and 300×250, and then set the priority as required and then, save the line item.
Adding creatives:
When it comes to adding creatives, you’ll follow the usual steps, but add all the inventory sizes including Native and check override.
Creative > Settings tab will take you to the screen where you can add size overrides as shown below. Note that you need to add these sizes in the line items before adding them here.
![]()
To sum it up,
To run native ads on your site using Google Ad Manager, you need to
– Create and save native styles (consider them as templates for ads).
– Then, create native ad units as usual.
– Populate native line items and creatives based on the campaign you wish to run.
For the guaranteed campaign, you will add the name of the native style in the ‘inventory size field and also, while adding creatives.
For native ads via ad exchange, you have to go with “Native (Native)” as inventory size and while adding creatives, you’ll select the ad format for which you have the native style created.
For banners ads vs native ads scenario, you’ll add both Native (Native) and sizes you would like to put against native ads in the inventory size and while adding creatives, you’ve to add all the sizes and check the override box.
Best Practices to Get Started with Google Ad Manager Native Ads
Although native ads are less intrusive than banner ads, there’s no assurance that native ads will always help you get a better yield than other regular display ads. It is better to experiment and then decide.
Also, we suggest you follow the list of best practices and while designing and implementing native ads on your website.
- While designing a native ad, ensure that it is responsive and fits all the devices. Make sure that it includes the essential assets – Headline, Ad choices icon, ad labeling, etc.
- To check the performance of each native style, keep running A/B experiments. Try changing fonts, ad sizes, image sizes, etc. to know which one is the highest-performing ad format.
- Target ad inventories wisely and always start small and then scale up slowly.
Sidenote: Programmatic native video ads works only when the user device is connected to a wi-fi network. You can’t run native ads via open bidding (exchange bidding).
What’s Next?
There’s no one-size-fits-all solution in adtech. Native ads, indeed, fit well with your content but users might scroll through it unless it is contextually relevant and delivered at the right moment. Besides, the demand for native ads is less compared to banner ads.
If you’re running native ads, you can go with PG or ensure you’ve also allowed banner ads to compete for the impressions. That way, you’ll reap the best revenue while rendering native ads whenever it pays you better. Have any questions or need any help with the setup, reach out to us.