Header bidding increases the CPMs of all the ads on your site and video ads command the highest CPMs among all the ad formats. So, combining video ads with header bidding is a sure-shot way to take your CPMs to the highest possible level. Since you want to use Prebid, there are chances that you’ve already used Google Ad Manager and video SSPs for monetizing your video ad inventory. Let us see how you can integrate Prebid for the same purpose.
The implementation takes place in two stages. In the first stage you setup your server i.e. Google Ad Manager, where you create the line items and creatives. In the second stage, you integrate the Prebid code on your site. The codes mentioned in this article are just examples, always refer to the Prebid documentation for updated JS codes. Our goal is to help you understand the overall steps and answer any questions you might have while you go through the process.
Table of Contents
Stage I: Setting Up the Ad Server
Step 1: Line Item Setup in Google Ad Manager
- Choose ‘Video’ in the New Line Item dialogue box
- Select all the video dimensions in the Expected creatives section.
- Set the type to ‘Price Priority’, date and time to ‘immediate’ and ‘unlimited’, set the rates and delivery option.
- Don’t forget to set hb_pb=BUCKET as targeting for every line item or hb_pb_BIDDER=BUCKET if using separate line items for every bidder.
- Save the line item.
- Duplicate the line items for every bidder.
FAQ: What is hb_pb?
Prebid uses hb_pb as a keyword to send the bids to Google Ad Manager.
FAQ: Why do we need the price buckets?
The header bidding partners return prices in their bids. The bids are rounded off according to the price-buckets before they are sent to the ad server as key values. Buckets save publishers’ from creating thousands of line items. For example, bids of $1.01 and $1.02 can be rounded off to $1.0 so that you don’t have to create 10 line items between $1.0 and $1.1.
Step 2: Creative Setup in Google Ad Manager
Due to video player constraints, bidders have to cache VAST XML to run the video ads. Caching is done in two ways:
- Some bidders cache the VAST XML tag on the server-side. In this case, you have to either create a separate line item for each bidder or a creative for each cache service.
- Other bidders rely on Prebid for caching. They use the AppNexus’ cache.
FAQ: What is VAST XML?
VAST or Video Ad Serving Template standardizes the communication between the ad server and the video player. Instructions like how to get the ad, where to redirect the user after the CTA when to render the ad, how long should the ad be run, etc. are communicated from ad server to video player with the help of a VAST tag. It structures the information with the help of Extensible Markup Language or XML schema. Hence the name VAST XML. You can read our dedicated article on VAST Tag for more details.
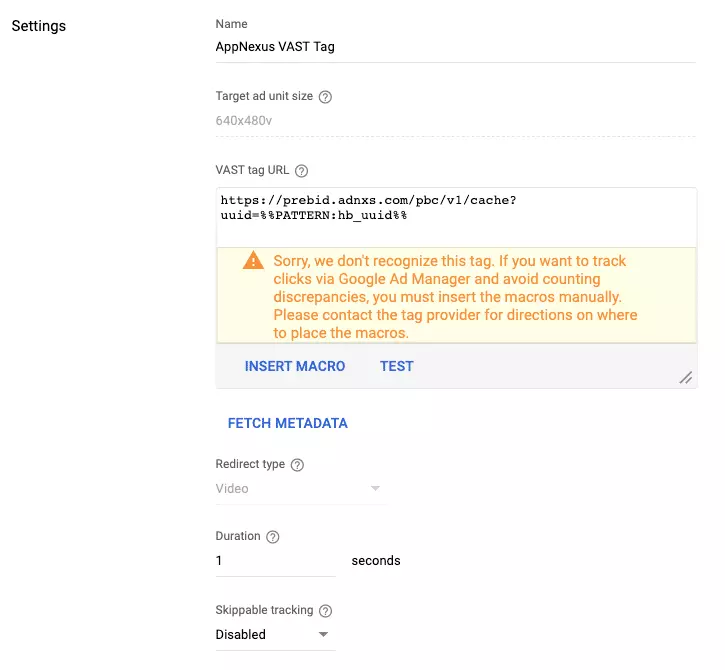
If you are creating a separate Line Item for each bidder:
- Go to the Creatives tab in each line item, click Add Creative, and choose your size.
- Choose Redirect in the dialogue box.
- Set the VAST tag URL to the cache location.
The VAST tag URL will be the same if you are using a single order for all bidders, for example:
https://prebid.adnxs.com/pbc/v1/cache?uuid=%%PATTERN:hb_uuid%%
or
[other bidder cache location]
The VAST URL will have bidder specific targeting variables if you are using different orders for each bidder, for example:
https://prebid.adnxs.com/pbc/v1/cache?uuid=%%PATTERN:hb_uuid_BIDDERCODE%%
or
[other bidder cache location]
FAQ: What is VAST URL?
VAST URL is a link to VAST XML. When you open a VAST URL, you get an XML file that is VAST compatible. Don’t be confused. You can think of VAST XML and VAST URL as two formats of the VAST Tag. You use the one that is supported by your DSP/SSP. Here we’ll use the VAST URL.
If you are using the same Line Item for all bidders:
As mentioned at the beginning of Step 2, you can use the same line item for every bidder, but you have to build a separate creative for every bidder that caches the VAST XML on the server-side.
- Choose Creative Targeting and “Add New Targeting” in the Expected creatives box of the Line Item.
- Give the targeting set a name and set appropriate custom targeting and save it.
- For the bidders that caches the VAST XML on the server-side, add separate creatives by going to Expected creatives, click Add Size, and choose Creative Targeting and Add New Targeting again.
- Give the targeting set a name, set appropriate Custom Targeting, and save it.
- Save the line item.
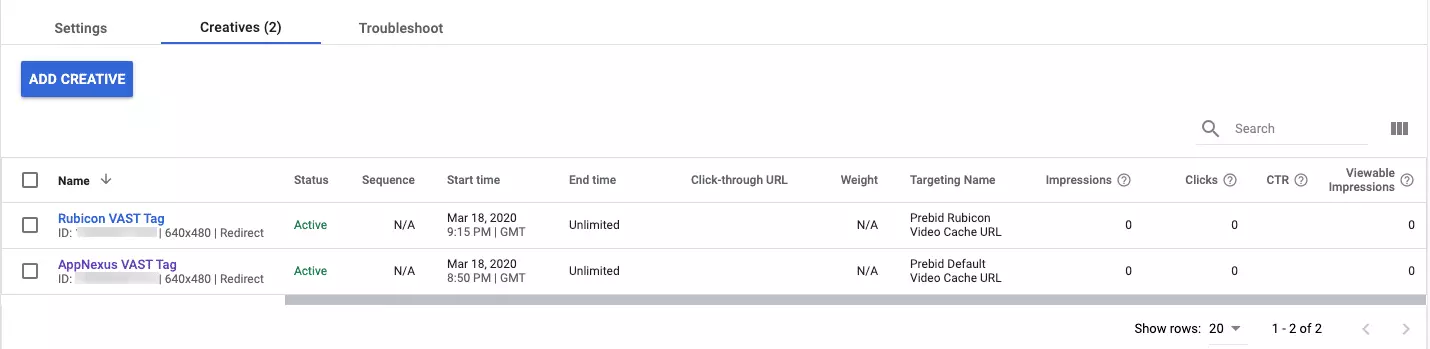
- Go to the Creatives Tab and make one creative for every target.
In the example below, we have created a separate creative for Rubicon because it caches VAST XML by itself and has a different video cache URL than the default Appnexus URL.
Here’s a video for reference.
Stage II: Code Implementation on the Site
Step 1: Creating a video ad unit
You have to start by creating an ad unit that’ll serve video ads from Prebid. The ad unit decides what kind of ads will be shown in an ad slot. Include media type (video), bidders, placement IDs, and other relevant parameters in the ad unit. You should visit Prebid’s Ad Unit Reference page to know all the parameters to be included. The ad unit code should look like this:
pbjs.addAdUnits({
    code: slot.code,
    mediaTypes: {
        video: {
            context: 'instream',
            playerSize: [640, 480],
            mimes: ['video/mp4'],
            protocols: [1, 2, 3, 4, 5, 6, 7, 8],
            playbackmethod: [2],
            skip: 1
        },
    },
    bids: [{
        bidder: 'appnexus',
        params: {
            placementId: 13232361
        }
    }]
});
Step 2: Implementing Custom Price Buckets
Prebid caps all CPMs at $20, so for example, if you receive a $24 bid, it will be rounded back to $20. With video ads, there are chances that the CPMs go way higher, so you need a solution for that.
Additionally, below $20, the CPMs are rounded off inside the price buckets of $0.01, $0.10, $0.50, etc. It means a bid of $1.78 will be rounded back to $1.50 if the price buckets are of $0.50 whereas, it’ll be rounded back to $01.70 if the buckets are of $0.10.
You have to set custom price buckets to make sure you are receiving the bids without incurring any losses. To do so, you have to use Prebid’s ‘setconfig’ object. Here’s an example:
const customConfigObject = {
  "buckets" : [{
      "precision": 2,  //default is 2 if omitted - means 2.1234 rounded to 2 decimal places = 2.12
      "max" : 5,
      "increment" : 0.01  // from $0 to $5, 1-cent increments
    },
    {
      "max" : 8,
      "increment" : 0.05  // from $5 to $8, round down to the previous 5-cent increment
    },
    {
      "max" : 40,
      "increment" : 0.5   // from $8 to $40, round down to the previous 50-cent increment
    }]
};

//set custom config object
pbjs.setConfig({
    priceGranularity: customConfigObject
})
Step 3: Requesting bids, build video URL
The next step is to implement the add AdUnits and request Bids functions. Your video player needs the URL where the video is stored. Most video players do not work directly with VAST, so the URL has to cache VAST XML. To make it possible, you have to make sure that you’ve included the dfpAdServerVideo module while building your Prebid.js. Here’s an example:
pbjs.que.push(function() {
    pbjs.addAdUnits(videoAdUnit);

    pbjs.setConfig({
        /* Or whatever your preferred video cache URL is */
        cache: {
            url: 'https://prebid.adnxs.com/pbc/v1/cache'
        }
    });

    pbjs.requestBids({
        bidsBackHandler: function(bids) {
            var videoUrl = pbjs.adServers.dfp.buildVideoUrl({
                adUnit: videoAdUnit,
                params: {
                    iu: '/19968336/prebid_cache_video_adunit'
                }
            });
            invokeVideoPlayer(videoUrl);
        }
    });
});
Step 4: Invoking video player on Prebid video URL
Finally, you have to invoke the video player on Prebid video URL. Here’s the example code:
<div class="example-video-container">
  <video id="vid1" class="video-js vjs-default-skin vjs-big-play-centered" controls
    data-setup='{}'
    width='640'
    height='480'>
    <source src="https://vjs.zencdn.net/v/oceans.mp4" type='video/mp4'/>
    <source src="https://vjs.zencdn.net/v/oceans.webm" type='video/webm'/>
    <source src="https://vjs.zencdn.net/v/oceans.ogv" type='video/ogg'/>
  </video>
</div>

<script>
  function invokeVideoPlayer(url) {
    videojs("vid1").ready(function() {
      this.vastClient({
        adTagUrl: url,
        playAdAlways: true,
        verbosity: 0,
        vpaidFlashLoaderPath: "https://github.com/MailOnline/videojs-vast-vpaid/blob/RELEASE/bin/VPAIDFlash.swf?raw=true",
        autoplay: true
      });
      this.muted(true);
      this.play();
    });
  }
</script>
What’s Next?
Setting up header bidding for your videos through Prebid may sound daunting but as a publisher, you shouldn’t be dealing with any such complexities. You should contact a monetization solution provider and let it deal with the process. If you are interested in running in-stream video ads or have any setup-related questions, you can reach out to us. Our implementation makes sure that the video ads served on the page are relevant to its contents. Even if you are not using Prebid or AdX, you can still use GAM to serve video ads, the setup is very similar.