
Ad tags are one of the essential parts of an ad campaign. But they’re not just a part of an ad campaign. They’re also crucial on any website because they help you determine how the ads are served.
That being said, a lot of learning and knowledge go along with putting up ad tags, which some publishers might need to learn about. If you want to learn more about creating your ads and getting advertisers to compete for your ad inventory, this blog will help you. I’ll dissect the importance of ad tags in advertising and explore exactly how they work.
Table of Contents
Understanding Ad Tags
An ad tag is a piece of code that you place on your website to initiate ad requests to the ad server for serving ads. Its primary function is to send information to your ad server and provide information on what type of ads to show, how often they should be shown, and where they should be shown.
Advertising tags also send data on ad performance, such as impressions, views, and clicks, back to ad servers for measurement and reporting.
How Do Ad Tags Work in Ad Serving?
Wondered how the little code snippet for an ad works. Let me explain.
- The publisher generates an ad tag using an ad server (e.g., Google Ad Manager).
- The ad tag contains information about the ad, such as its size, format, and targeting parameters.
- The publisher inserts the ad tag into their website’s HTML.
- When a user visits the website, the ad tag requests the advertiser’s ad server to serve an ad.
- The ad server receives the request. It looks for an appropriate ad to display based on factors such as the user’s location, interests, and browsing history.
- Once the ad server has selected an ad, it sends it back to the ad tag, which displays it on the website.
- The ad tag also sends information back to the publisher’s ad server, such as the number of impressions, clicks, and conversions generated by the ad. This data is used to measure the ad campaign’s performance and optimize future advertising efforts on the website.
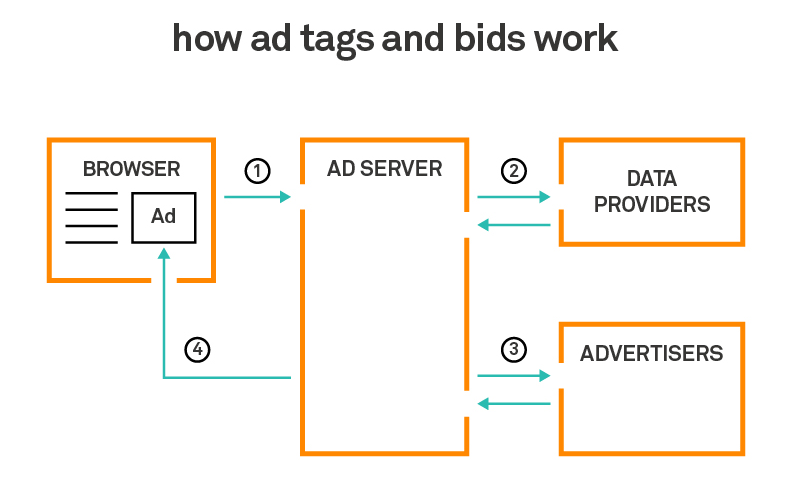
Source: Working of ad tags
Ad Tags Example
Here is the simple ad tag example from DoubleClick- Let’s break down the sections and see what their purposes are:
“http://ad.doubleclick.net/ADJ/publisher/zone;topic=abc;sbtpc=def;kw=xyz;tile=1;slot=728×90.1;sz=728×90;ord=7268140825331981?”
http://ad.doubleclick.net/: The first section specifies the ad server and its host address. In this example, DoubleClick is the ad server, which is now Google Ad Manager
/ADJ – This part represents the requested ad type. Here, it is denoted that a JavaScript tag is used to serve image ads.
/publisher – This part contains information about the publisher and helps demand partners validate the publisher’s identity.
/zone;topic=abc; sbtpc=def; – This part specifies the zone, topic, and sub-topic of the website. For example, zone: news, topic: Sports, subtopic: Hockey. It gives detailed information for buyers to target relevant and precise.
kw=xyz – This part includes one or multiple keywords that describe what the
web page is about.
tile=1 – Tile is a unique value assigned to each ad call to prevent the same ads from getting displayed at different ad locations.
slot=728×90.1;sz=728×90; – The part specifies the specification of the ad slot: size and slot’s ordinal number.
ord=7268140825331981? – This element prevents the browser from loading the same ad from the cache while the user returns to the same page.
The Different Types of Ad Tags
These two types of ad tags are used for different purposes: Synchronous and Asynchronous.
Synchronous ad tags are traditional ones, where the ad content is loaded simultaneously with the rest of the page content. This means the page cannot fully load until the ad content is also loaded.
They work well if you want to show a single ad simultaneously. But they may be less effective if you try to show multiple ads simultaneously because they block the UI thread and can cause delays in page load times, which can negatively impact the user experience.
Asynchronous ad tags load the ad content separately from the rest of the page content, allowing the page to load more quickly. This results in faster page load times and a better user experience.
For this reason, asynchronous ad tags are generally preferred over synchronous ad tags because they provide a better user experience and can result in higher ad revenue for publishers.
Third-party ad tags: The publisher places these advertising tags on the website to serve ads from third-party ad servers. The ad network or platforms like Google AdSense generate third-party tags.
When an ad request happens, the ad tags’ code executes and fetches the ad from the third-party ad server to display it on the designated ad slot.
How to Generate an Ad Tag in Google Ad Manager?
Creating tags for ads can be a time-consuming task. Maintaining consistency of the platform is one of the critical factors in making an efficient campaign. However, Google Ad Manager provides the functionality for quick ad tagging. This process will help you create new tags quickly*. Once you have created a new tag, you can use the tag for any campaign in the ad server.
*Prerequisite: Creating an ad tag requires the publisher to create an ad unit first.
To generate an ad tag in Google Ad Manager, follow these steps:
- Log in to your Google Ad Manager account.
- Go to Inventory> Ad unit. Select the ad unit for which the tag is to be created.
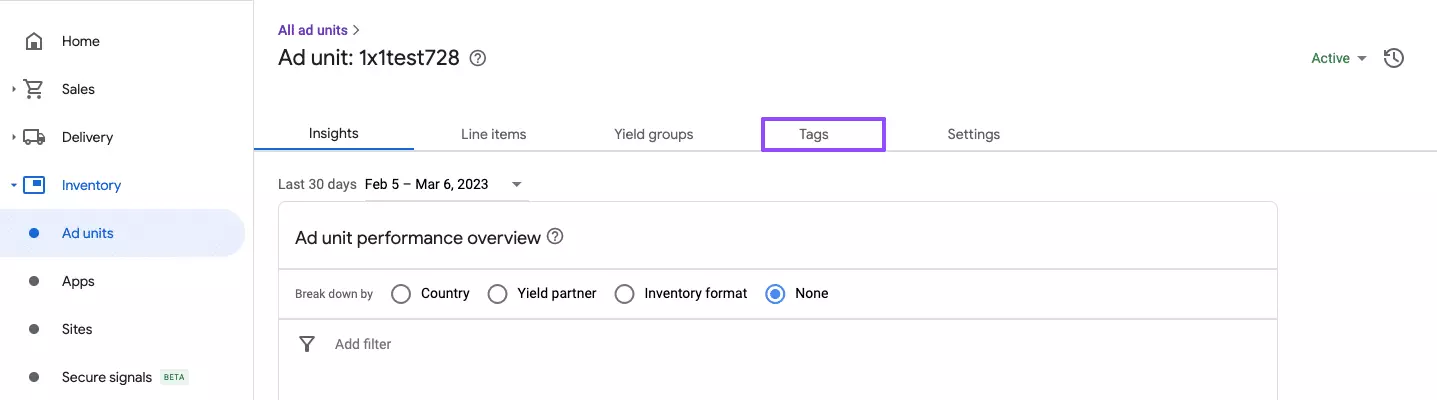
- Select the Tags tab on the ad unit page.
- In the next step, select the type of ad tag you want to create based on your requirements. Google Ad Manager provides three types of tags:
Google Publisher Tag: Used for display ad formats on the website or mobile app.
Mobile Application Tag: Used for mobile app ads.
AMP Tag: Used for display ads on AMP-enabled web pages.
Ad Exchange Tag: Used for display, mobile app, and in-stream video ads.
In that case, go for Google Publisher Tag. Once selected, you must provide details about managing the ad unit. Let me explain each field in your Ad Manager interface.
- Passback tag: A passback tag is used when an ad impression remains unfilled (which means there’s no ad to serve on the ad inventory). Publishers often use the passback tag to serve their in-house ads.
- Single request: This sends a single ad request to the server instead of multiple requests. Using this request mode is advisable for all publishers.
- Empty divs: This feature enables publishers to collapse the ad space that remains unfilled by the advertiser.
- Out-of-page creatives: The selection allows you to select various ad formats from the pop-up, floating, and pop-under ads.
- You can Continue and generate the Google Publisher Tag for your ad unit.
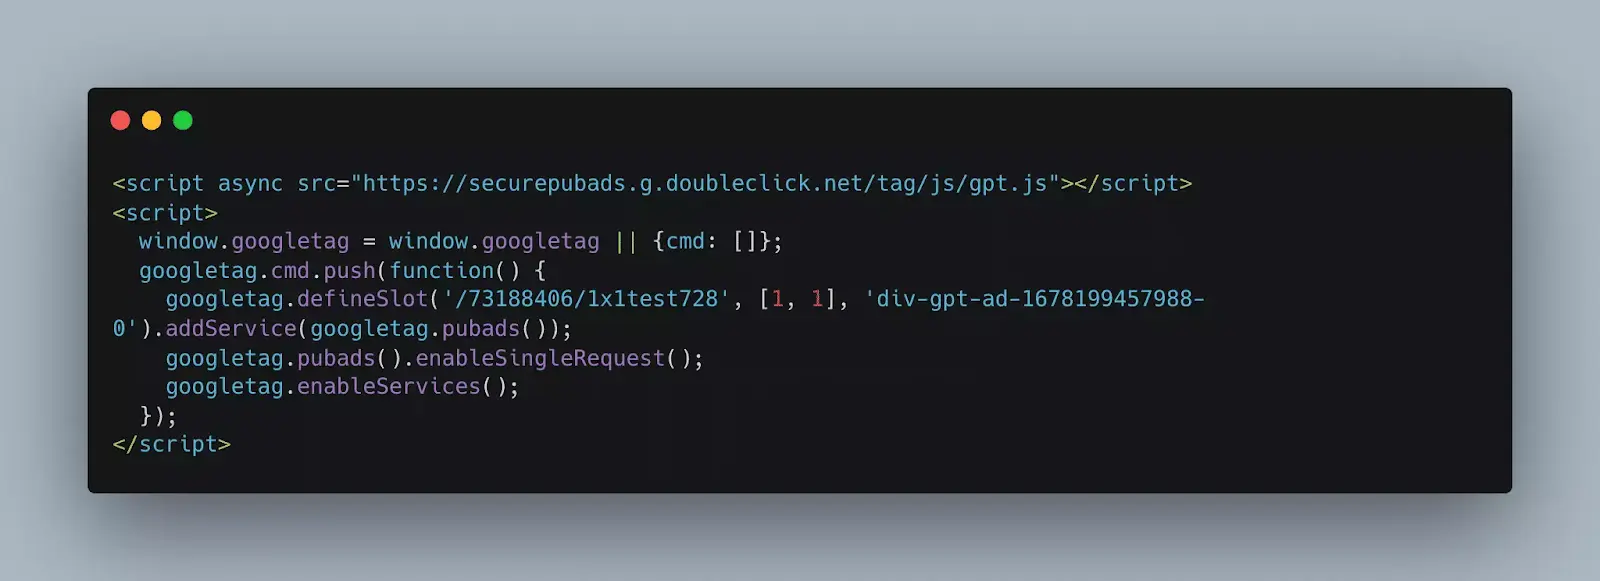
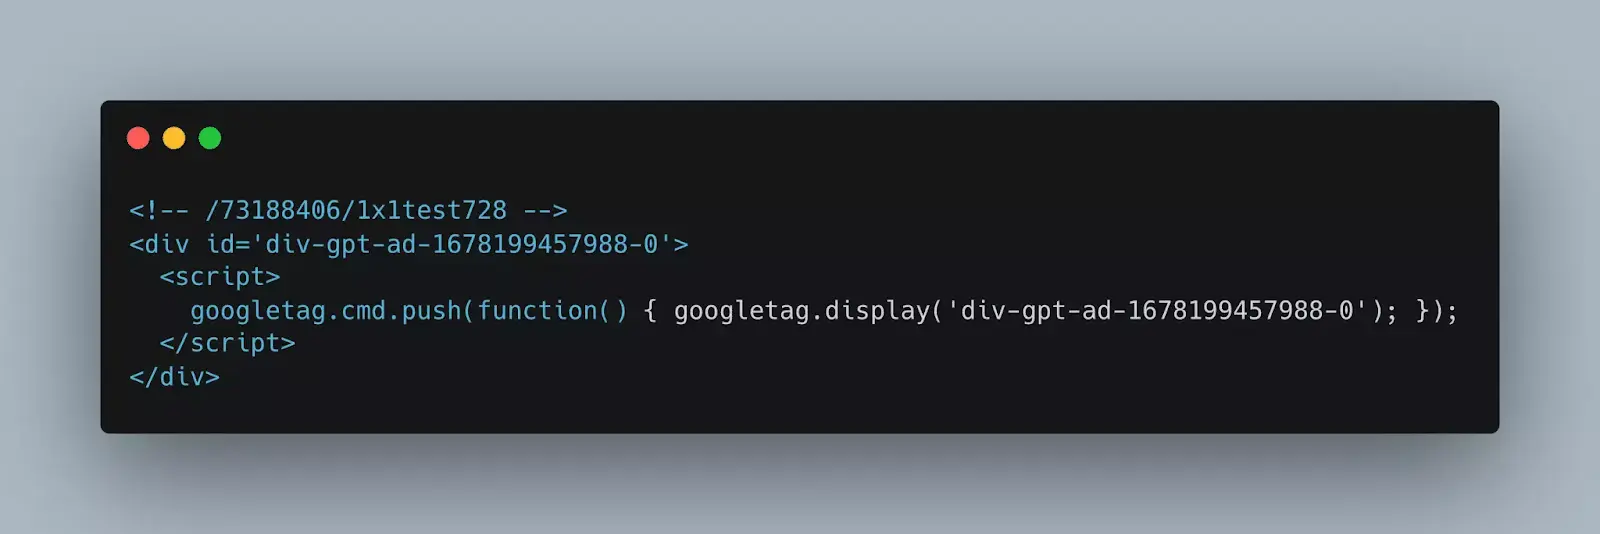
Note that you will get a head and body tag that must be placed in their respective locations. A sample code looks like the below:
Head Tag:
Body Tag:
Tips to Create Effective Ad Tags
Ad tags are essential to display the right ads at the right location to the right viewers. These can all happen only when you set up the ad tags correctly. Here, let’s see a few tips for the efficient creation and implementation of ad tags.
Ad tag testing: First, test your ad tags to identify and fix issues such as incorrect sizes, slow loading, or incompatible formats.
You should test the ad tags across different browsers, platforms, and devices to check if they comply with industry standards and advertiser requirements. This will help ensure a consistent user experience.
The tools like Google Publisher Console, Google Tag Assistance, or Ad Inspector can be used to test your ad tags.
Ad tag validation: Validation helps avoid discrepancies or errors that affect reporting and billing. To validate your tags, compare your ad server results with those from the buyer’s ad server or use any ad verification services.
The comparison metrics can be impressions, clicks, and conversions. It is also better to inform advertisers about the validation results and changes made after validation.
Ad tags optimization: Ad tags initiate an ad call to the server. You can optimize this request initiation by using best practices like responsive design, lazy loading, asynchronous tags, dynamic allocation, etc. This will help you improve ad performance and user experience by preventing issues like page latency.
It is ideal for tracking metrics such as viewability, fill rate, CTR, and eCPM to make changes, which are needed to improve revenue.
Code updation: You should update your ad tags whenever there are changes in industry standards, the latest trends, and new privacy policies.
This helps you comply with the changes and maintain a positive user experience. This update also helps remove any inactive or obsolete code that affects site performance and security.
Wrapping Up
Now you know an ad tag; you can set it in your ad server. The ad tag is a vital piece of any online ad campaign and should be given as much consideration as the design of the ad itself. The goal is to make your ads stand out while being informative and practical.
Think long and hard about your target audience, what they want to know, and how you can make them take action. This is a seemingly simple task in theory, but there is a lot of nuance in practice. And for that reason, any publisher looking to get into advertising needs to put as much time and effort into their ad tag as they do their ad design work.
FAQs
What Is an Ad Tag?
An ad tag is a piece of code that enables the serving of the ad and provides information such as ad size, targeting, and tracking.
What Are the Different Types of Ad Tags?
There are four types of ad tags: Google Publisher Tag (GPT), Mobile Application Tag, AMP tag, and Ad Exchange tag.
How Does an Ad Tag Work?
When a user visits a website, the ad tag sends a request to the ad server to display an ad. The ad server selects an ad matching the targeting criteria and displays it on the page where the ad tag is placed.