You have a Google Ad Manager account that you’re using to display online ads on your website. You want to begin using Amazon’s Unified Ad Marketplace (UAM) but don’t know how to do so. In this tutorial, I will show you step-by-step how to integrate both Amazon’s Unified Ad Marketplace and Google Ad Manager to display ads from both Amazon’s and Google’s advertising partners.
Table of Contents
How to Integrate UAM with GAM?
If you are integrating your site only with UAM (no other header bidder), just go to your UAM account > Set Up Ad Manager > Add New Ad Manager Account and follow the steps for UAM and Ad Manager integration.
Next, go to Resources > Add Javascript > ‘Integrate UAM alone’ to find the javascript that has to be copied and pasted into your site’s header.
How Does It Work?
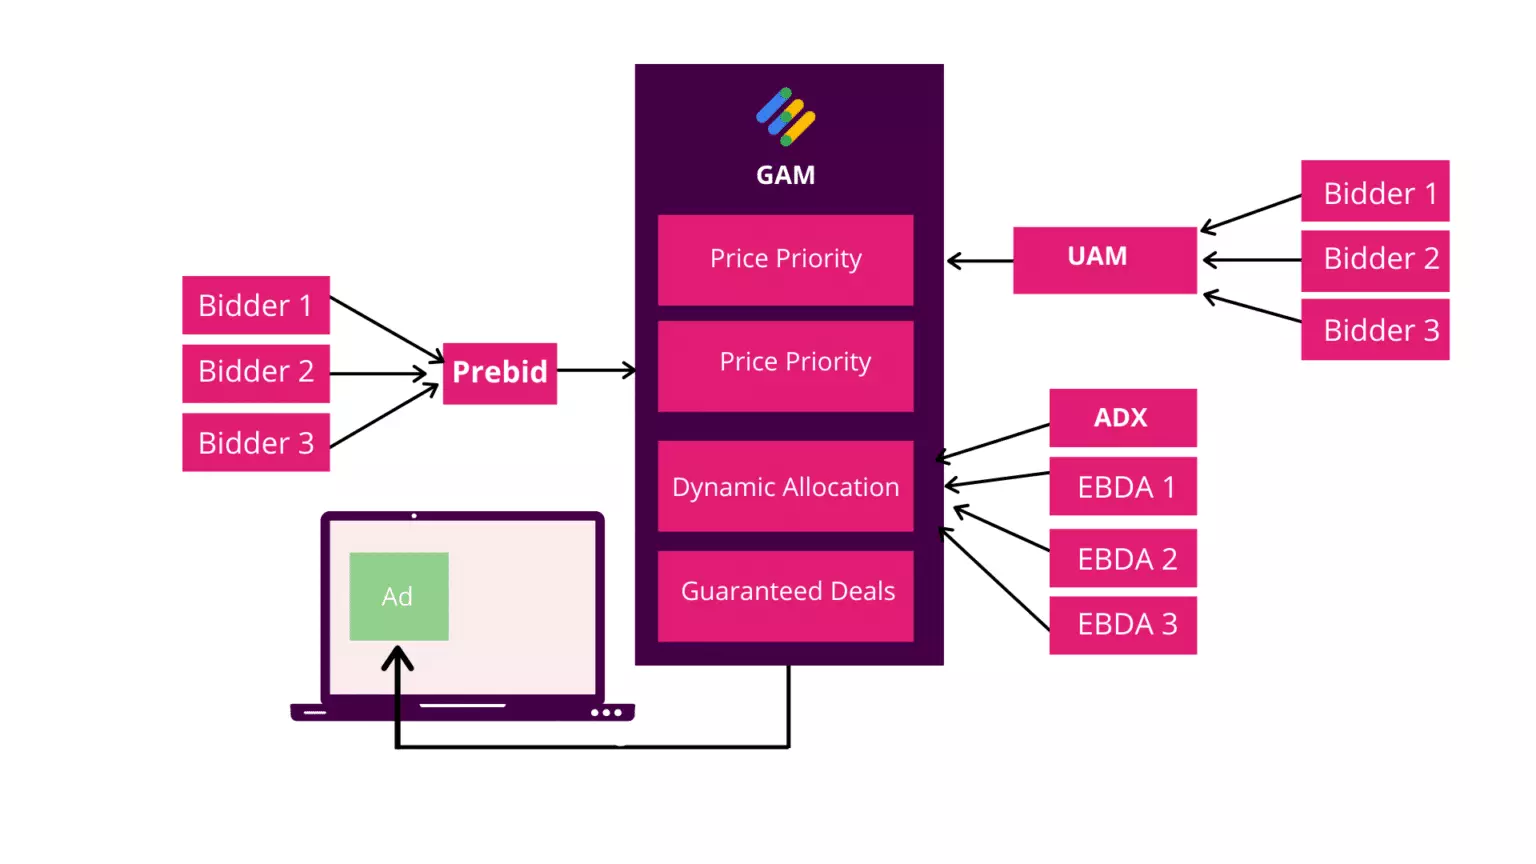
The working procedure of the setup is fairly simple. Just as always, Prebid will send its winning bids to GAM as Price Priority line items. Similarly, UAM will send its winning bids as Price Priority line items from the server side. Once sent, these bids face competition from Exchange Bidding (if enabled) and Google AdX through dynamic allocation. Ultimately, the winning bid from this auction delivers the ad.
How to Integrate UAM with Prebid?
Publishers can integrate UAM with Prebid in 2 steps.
- Create a Service Account for API Access.
- Website’s Integration with UAM.
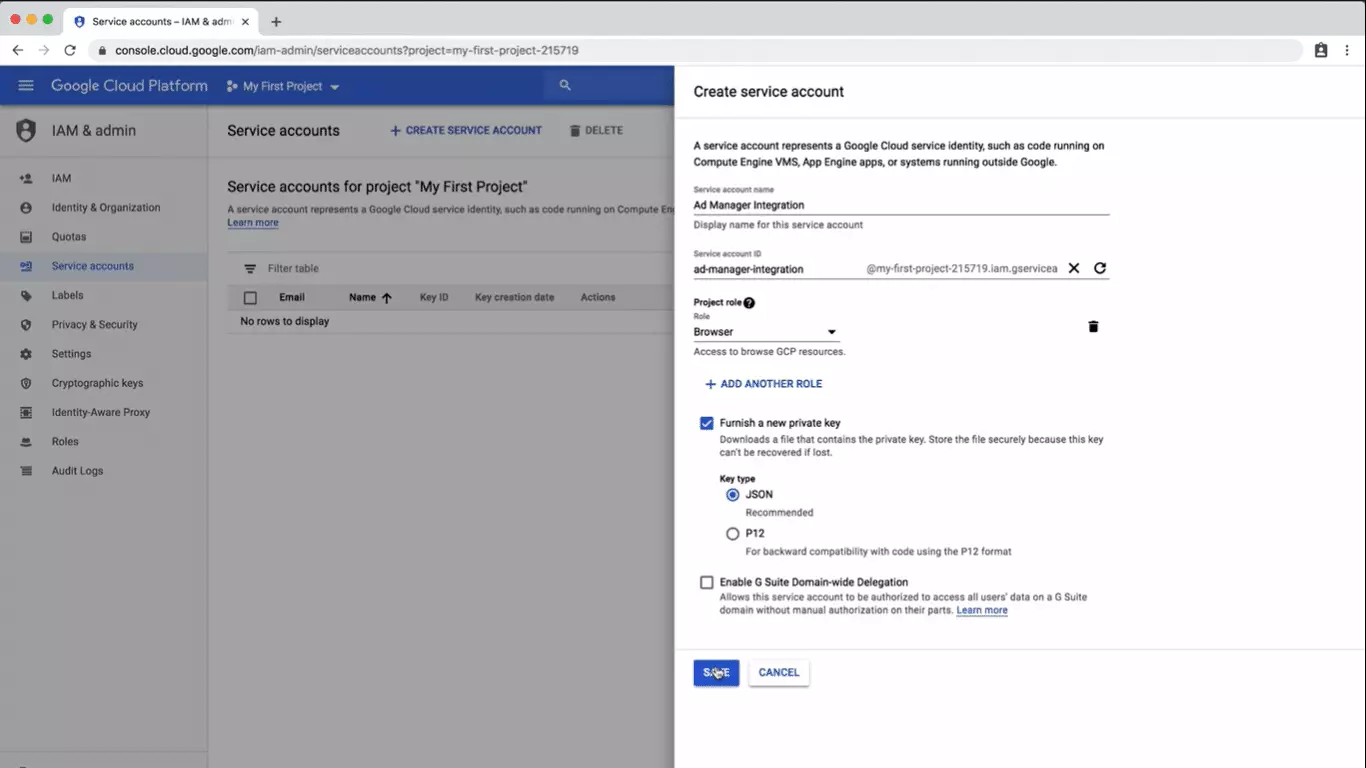
Step #1: Create a Service Account for API Access
Since the Unified Ad Marketplace works on the server side, the integration takes place with the help of API. You need to give API access to Amazon UAM, and for that, you need to create a service account.
- Go to the Google Cloud platform by visiting console.cloud.google.com.
- In the left-hand navigation bar, hover over IAM and Admin and select Service Account.
- Then click on the Create Service Account button.
- Fill in all the details, furnish, and download the created JSON file.
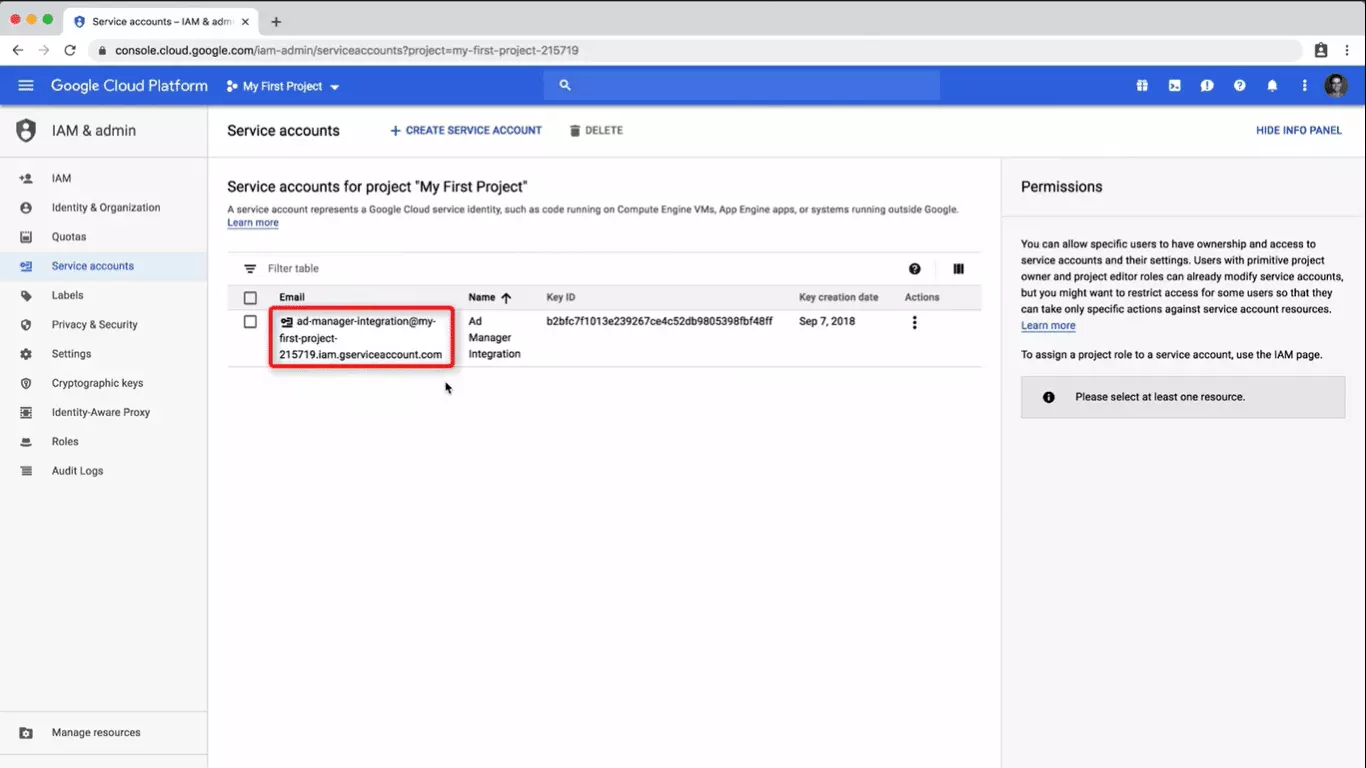
- Copy the email value for your service account.
- Now sign in to your GAM account
- Go to Admin> Global Settings and check the box that says “API Access.”
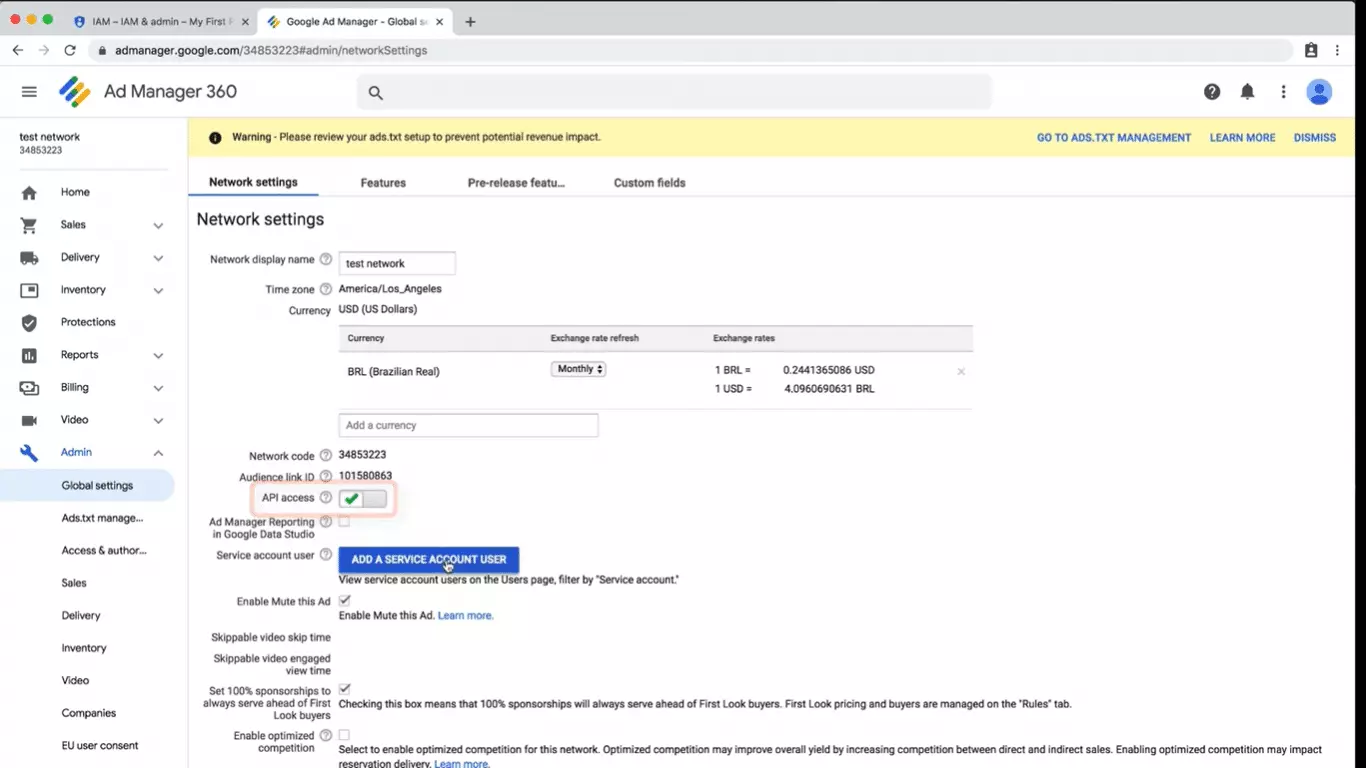
- Select Add A Service Account User.
- Fill in the details, and paste the email values copied earlier in the ‘Email’ field.
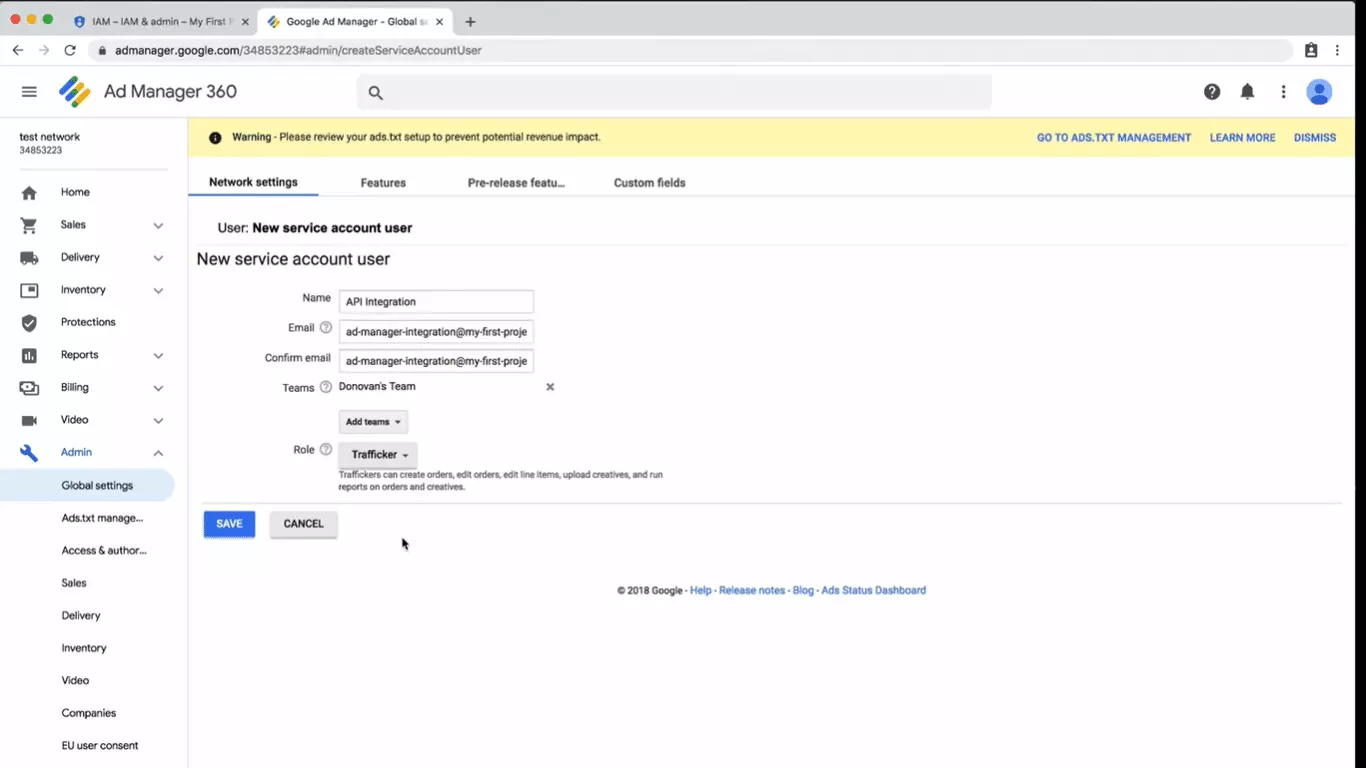
- Click Save.
After enabling the API access, you can follow the steps mentioned in “How to integrate UAM with GAM? (at the start of this article)” to let Amazon generate the required line items. Wait for a few hours for the process to complete. If you face any issues related to the API setup with Google Ad Manager, you can visit https://developers.google.com/ad-manager.
Step #2: Website Integration with UAM
Now, coming to your website’s side:
- Integrate your site with Amazon from the setup page.
- Deploy the Ads.txt file.
- Add the javascript to your site. Here are the steps to successfully add Amazon’s javascript to your site:
- Copy the APS (Amazon Publisher Services) javascript from UAM’s setup page
- Choose the integration configuration from “Integrating alongside prebid”, “Integrating alongside any other header bidders” and “Integrate UAM alone”.
- Add your Publisher ID.
- Add your “slotID’s, slotName’s, and sizes”.
- Test your integration with Amazon’s Debug Console.
- Update your Ads.txt file.
- Validate your integration.
While integrating with prebid, the calls can either be made sequentially or parallelly. Parallel integration is generally the preferred mode because parallel requests are faster than sequential ones.
Sequential and Parallel Calls
Sequential Calls
When the calls are made sequentially, you have to manage three API calls:
- The bid requests from each bidder, ie apstag.fetchBids() and pbjs.requestBids()
Please note that when the calls are being made sequentially, you should place the above functions as together as possible so that both Prebid and UAM get an equal amount of time to complete their auctions. - Setting key-value pairs with bid information (APS: apstag.setDisplayBids(), Prebid: pbjs.setTargetingForGPTAsync()).
- GAM request: googletag.pubads().refresh()
Parallel Calls
Making parallel calls is the ideal method for integration, as we mentioned above. You must apply logic to initiate the ad request to GAM when both APS and Prebid have returned the bids or when the failsafe timeout has been reached.
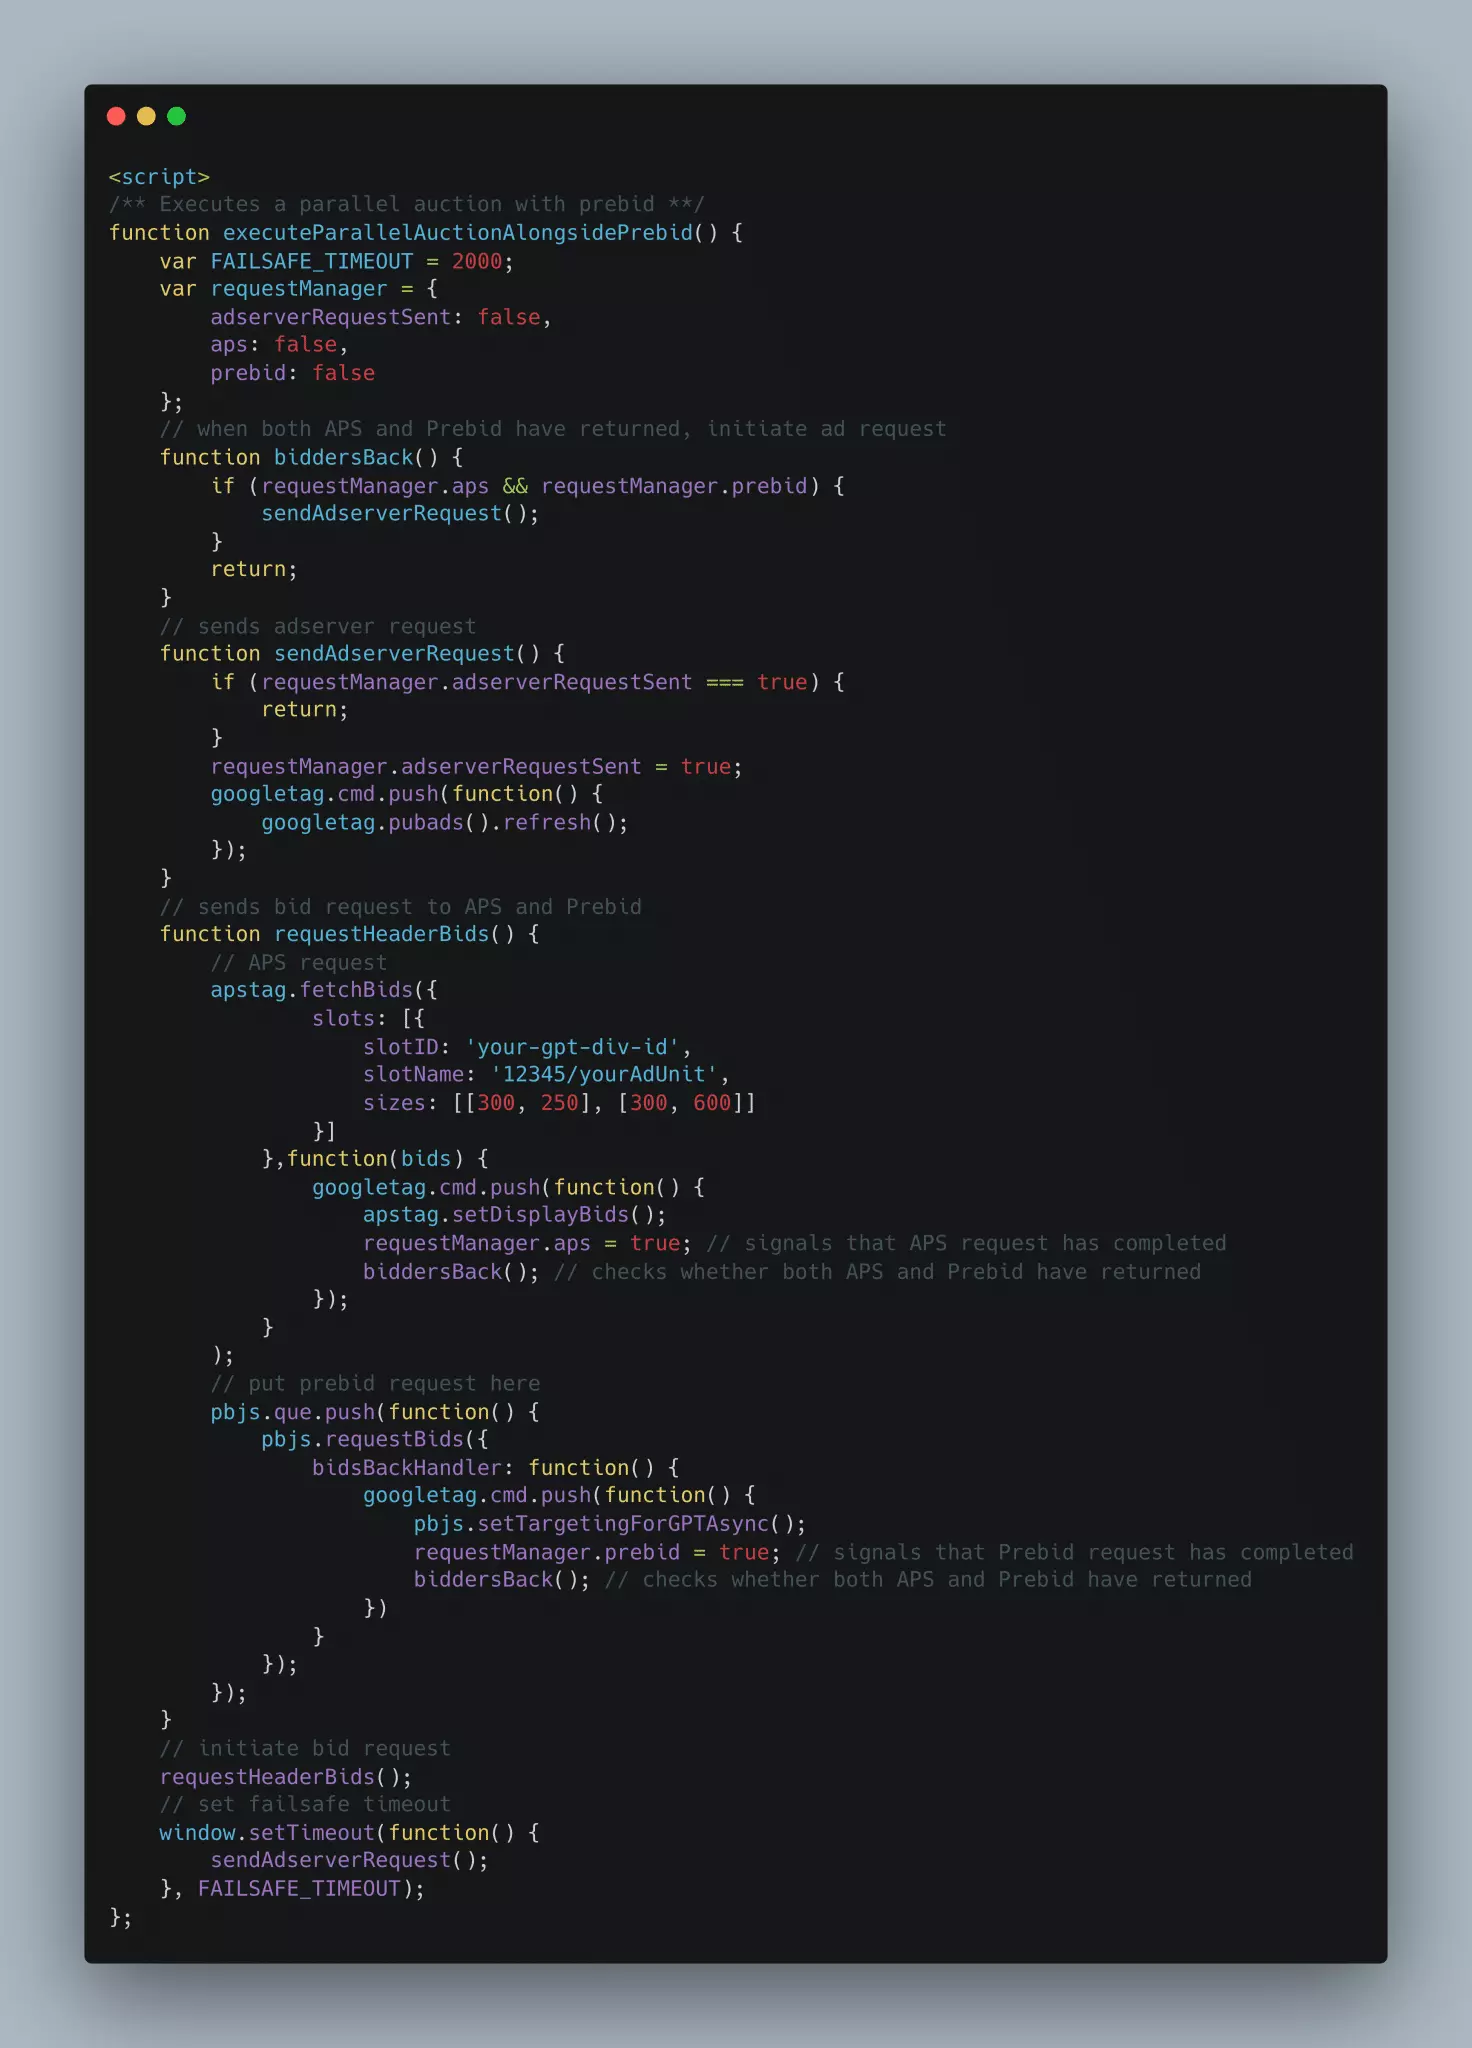
Amazon has already created a request manager for easy parallel integration. The executeParallelAuctionAlongsidePrebid() function will manage the calls to Prebid, APS, and GAM.
In your prebid configuration, first, you have to move your pbjs.requestBids() code block into the requestHeaderBids() function, and then remove the pbjs.sendAdserverRequest() code block. We are removing it because now this call will be made inside the executeParallelAuctionAlongsidePrebid()function. This function will include:
- Set universal timeout.
- Request config settings
- biddersBack()function: It’ll be called once when APS returns and again when Prebid returns. After the last bidder returns, the sendAdserverRequest()is called.
- sendAdserverRequest(): It’ll make a request to GAM either when both bidders have returned or when FAILSAFE_TIMEOUT has been reached.
- requestHeaderBids(): It’ll initiate the bid requests to APS and Prebid
- FAILSAFE_TIMEOUT: It’ll set the time frame for the GAM auction
Example code from Amazon:
What’s the Ideal UAM Setup with Header Bidding?
The ideal setup would be to make Amazon UAM compete with Prebid and Open Bidding on your site. All three sources will send their winning bids to the Ad Manager, and you’ll get the highest rates. Such a setup generally yields the best results for most publishers.
It’ll be possible when both Prebid and UAM are set to send their winning bids simultaneously as Price Priority Line Items. The bids will then compete with the bids sent by AdX via Dynamic Allocation.
Conclusion
The setup can be complicated for a few publishers as it requires certain technical expertise and coding skills. The best course of action is to work with a wrapper technology provider/managed service provider for the setup. Such service providers will already have all the requirements fulfilled for you. For instance, once your site is whitelisted and Amazon verifies ads.txt, your monetization partner can do all the integration work within a day.